A few weeks ago I was contacted by the distributors of iDraw Generative Machines with a proposition: I could receive an iDraw plotter in exchange an honest review.
Those of you who have read my blog before probably know that I am really interested in the intersections of art and technology. Those of you who have read my blog before probably also noticed that the blog hasn’t been active for a while. This is due to a lot of things — primarily because I’ve shifted my focus away from coding a little bit to enroll in a year long art program.
I’ve improved my artistic skills tremendously this past year and I’ve continued to code in the capacity of a bootcamp instructor – teaching for Practicum by Yandex, an online program which I’ve really enjoyed working at. However when opportunities like this come along I’m rarely one to turn them down. Especially in this case, because I realized I could do really cool things with my paintings if I had a pen plotter that could draw things like fractals which would be really time consuming for me to draw myself. Not to mention it can also cut vinyl. The possibilities!
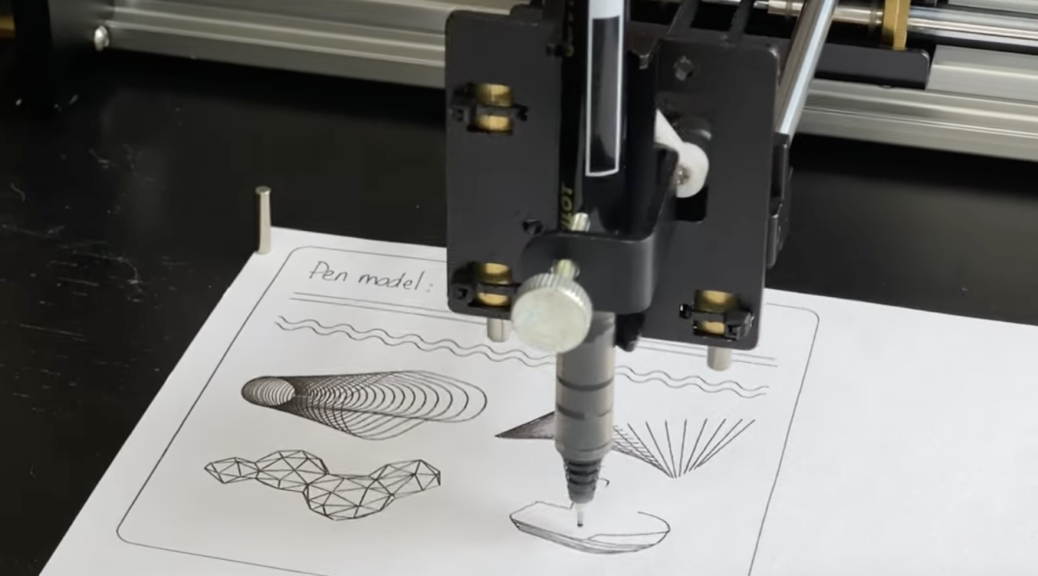
The pieces of the iDraw A4 Acrylic.. before assembly
What I didn’t realize when I agreed to review the iDraw while getting excited imagining all the things I could do was that the machine is very much a DIY contraption. Meaning, it arrives in a million different pieces and requires a great deal of time and attention to detail in order to put together. Granted I should have perused the links that were sent to me more carefully but I would be lying if I didn’t say my heart sank a little when I opened the box and saw all the little screws and cables inside. It should have also occurred to me that the price tag was simply too low for them to bring you a fully assembled machine – a quick google search will show you assembled pen plotters can go for $250 or more pretty easily.
That being said, I’ve never shied away from a challenge so after recovering from my initial disappointment, I went to work. And let me tell you friends, it WAS work. Of course if you are an expert at DIY or you have a lot of experience with Raspberry PI and that sort of thing, this might not seem so challenging to you. The extent of my expertise with building and assembling things would be putting together furniture from IKEA. This is a whole other level from IKEA, though. First of all, the pieces are much smaller. Second of all, there are more ways to put things together in the wrong orientation. Third of all, the instructions have parts where you have to refer to videos that are hard to see all the details (like which side of the belt faces which way, for instance).
The video above is a time lapse compressing about 2 hours of work assembling the device into about 5 minutes. There were moments when I became very frustrated and wanted to throw the whole thing out of the window but I am glad I persevered. After 2 hours my phone died and I was too focused on assembly to record the rest.
One thing to note – it took me a little while to find the assembly guide for the version I had but once I did things went along much faster. A review of the iDraw wouldn’t be complete without covering the parts I struggled with the most:
Attaching the covers to the back of the two ends where the motors are situated. I would tighten the screws on the opposite side of the t-nuts but the t-nuts would not revolve and so would not lock into the opposite side like they were supposed to (page 28 of the assembly guide) . I seriously just gave up on this. Maybe I will glue them – we’ll see.
Attaching the two panels with the linear bearings together. I was holding it upside down while stacking the flanged bearing and standoff plastic and then forgot it wasn’t attached at the bottom so I lifted it momentarily off the table and everything fell apart. Then later on I guess I didn’t tighten the nuts enough because the whole middle piece fell apart while I was attaching the ends and was MUCH harder to put together that time because I didn’t want to take all the other pieces apart again. (page 14 of the assembly guide)
The belt. Oh my god the belt. I thought I had it right following the video instructions but either something got screwed up after I first ran the machine or I just didn’t quite put it in correctly but this was the most time consuming part by far. You have to tie the belt off at the ends after you wind it through the 4 different sections of the plotter. In my case the ends of the belt kept coming untied and was driving me insane. After hours of fiddling and messing around with the software I finally realized that the belt wasn’t wrapping around the pulley part of the motor but instead had somehow slid up above it. This screwed up the tension in the belt and cause it to slide up in other crucial areas where it needed to be aligned to the pieces which make it turn smoothly.
The pen was going up when it should go down and down when it should go up. I wish I had googled it sooner because as soon as I did I found someone with the same issue and it turns out that you can actually adjust this in the Inkscape Axidraw extension (Axidraw has an extensive wiki which helped a lot for the software portion). There are basically two bars you can adjust, one which is labelled “DOWN” and one “UP.” What is a lot less obvious is you can actually adjust the bars to make “UP” be down and “DOWN” be up. Very confusing, but it worked for my purposes
Okay, so I’ve gone through the whole assembly process and probably made it pretty clear its not the easiest thing in the world. But more important than the challenges of assembly is the result, right? Was it worth all my pain and effort? So far I would say yes. It’s an incredibly cool machine, and for the purposes of my art the sky is the limit for what I can create. As an artist I love to paint free, loose, and a little messy. But having this tool will make it so I can incorporate little details and elements in my work that I couldn’t otherwise. It’s also just really fun to watch it go. Honestly its more entertaining than a lot of reality shows that are out there.
Now that the assembly is behind me I’m feeling very excited again – I have lots of ideas for things I can make and sell. Thinking about opening a new etsy shop and creating some more video content of the machine at work.
If the thought of assembling this plotter sounds intimidating and you’re not sure you’re up for it, there are some plotters which come partially assembled and are for sure easier to work with.
Here is a video of my first time running a more complex drawing on the machine. Note that I had to pause it part way because I realized that my pen wasn’t depositing enough ink so I had to switch pens and shifted the drawing slightly in the process.
Of course I’m planning on using much more than a pen when I work on my future projects. I’d like to experiment with markers, paintbrushes, and of course a laser once I figure out where to get one. It would be cool to do wood burning with a laser but I’m not sure a compatible one is powerful enough. I will update this iDraw review with more info as I figure it out. Of course there are also a lot of options with vinyl cutting. I’m impressed with how it can draw such thin and precise lines.
Before I became a programmer I loved to play games. I played games for many years before I even knew the most basic concepts about coding. However these days I see that people are trying to introduce their kids to programming and looking for ways to make programming concepts more approachable. I think that using existing games people love is a great way to do just that. That is why I wanted to start this new coding for gamers blog series.
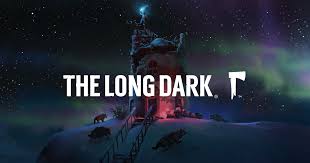
If you are reading this you might already have at least some interest in The Long Dark, and may have played it. But I will briefly explain the game just in case. The Long Dark came out on Steam several years ago and had a beta release that was primarily a survival simulator. The game takes place in the Canadian far north where a mysterious phenomenon has caused all of the power to stop working.
In the original simulator, your goal was essentially to survive as long as possible by staying hydrated, nourished, rested, and avoiding freezing to death. You could choose between different environments to try your luck in, some which have a range of man made shelters and some which have nothing but a few caves dotting a barren landscape teeming with aggressive wildlife.
An example of some aggressive wildlife. You can see the health meters at the bottom left
By releasing a minimum playable version of their game early, The Long Dark developers gave players something to continually look forward to and give valuable feedback on as they added more features to create something truly spectacular. Now the game has a fully fleshed out story mode with multiple seasons and difficulties in addition to special challenges. Whether you’re developing a game or an application for a startup, the idea of slowly adding on features and polish over the course of time is the most logical and sustainable way to build a good product. It goes to show that when you learn to code with games like The Long Dark, you might be surprised by how many lessons will transfer over from games to other types of development.
It goes to show that when you learn to code with games like The Long Dark, you might be surprised by how many lessons will transfer over from games to other types of development. Examining games from a developers perspective and extracting a feature to recreate can also help you get into video game coding, so it’s a win win.
While its good to talk about strategy and general practices like building off of something small, I want to get into actual coding in this post. After all you can’t learn to code with games unless you actually write some code! In particular, I want to show you how we can take a feature from a game like The Long Dark and try to replicate it with Javascript code. I suggest starting with something simple, like a hunger meter. We could define a variable like fullness.
let fullness = 100;
Why fullness and not hunger? Certainly nothing is stopping you from calling the variable whatever you want, but in my mind it is easier to call it fullness because then I can set it to 100 and know that means “completely full.” Whereas if I used hunger, I might be confused. Does 100 mean 100 percent hungry? Hunger doesn’t make as much sense to measure by percentage as fullness.
In The Long Dark, you get hungrier the longer you don’t eat. That means we need something to measure time. Since it’s a video game, time also goes by a lot faster than in real life. So let’s say every 30 seconds translate into 1 hour. We could use a Javascript function like setInterval that would get called every time 30 seconds have passed. You can read more about the function and test it out here. Note the double slashes in the code below indicate comments.
let fullness = 100;

setInterval(function(){
   fullness = fullness - 5; //subtract fullness by 5 percent
   console.log("logging fullness", fullness);
}, 30000); // 1000 is 1 second (in milliseconds)
By assigning fullness the value of itself minus 5, I am essentially decreasing fullness by 5 percent. Then I am logging out the new fullness value to the console, so I can confirm that my function is working. Having to wait 30 seconds to confirm my function is working can be a little bit annoying, so you can reduce the number of milliseconds to 1000 temporarily for testing purposes.
If you’re using a coding editor in the browser such as Codepen (I’ll be including a Codepen link a little further down) the console can be opened up by clicking on the “console” button in the bottom left corner of the editor
So now we have a fullness value that decreases over time, but what about eating? In The Long Dark you can eat all sorts of things. If you scavenge you can find canned beans, peaches, even dog food (ew) to eat. Or you can go fishing or hunting. Each type of food has a different number of calories which affect how much your fullness meter gets filled.
For now, let’s just create four foods. A granola bar, some canned beans, a pound of deer flesh, and a rainbow trout. Let’s say 200, 450, 800, and 150 calories respectively.
const trout = 150; //use const to declare a variable when you never change the value of the variable
const deer = 800;
const granola_bar = 200;
const beans = 450;
Now you might be thinking we have a problem, and you would be right. If we are counting our fullness as a percentage and our food in calories, how will we add them together? Looks like we will have to make some changes to our existing code, after all. The average man needs to eat about 2,500 calories per day. For the sake of simplicity, let’s say that is the number that constitutes 100% fullness.
const maxCalories = 2500; // maximum calories you can eat
let currentCalories = 2500; //calories you need to eat per day
let fullness = 100; // still keeping percentage for display purposes
const trout = 150;
const deer = 800;
const granola_bar = 200;
const beans = 450;

setInterval(function(){
   currentCalories = currentCalories - 60; //subtract fullness by 60 because we burn 60 calories per hour while sitting
   fullness = (currentCalories/maxCalories) * 100 //calculate fullness percentage
   console.log("logging fullness", fullness);
}, 30000); // 1000 is 1 second (in milliseconds)
Above you can see I’ve added two new variables, maxCalories and currentCalories, which make it very easy to do our math in setInterval to calculate the fullness percentage. Just divide currentCalories by maxCalories and multiply by 100. We also are subtracting 60 calories every 30 seconds because that is how many calories we burn per hour when we are sitting. Now we are ready to add an eatFood function. This one should be very simple. Just updating currentCalories, right?
At first glance this would seem to be enough, but ultimately we will want to display the fullness data and update it every time currentCalories changes. In that case, it makes sense to create a function for updating fullness as well, to avoid rewriting the math multiple times. Let’s take a look at the whole thing again (minus the variables).
setInterval(function(){
   currentCalories = currentCalories - 60; //subtract fullness by 60 because we burn 60 calories per hour while sitting
   updateFullness()
}, 30000); // 1000 is 1 second (in milliseconds)

updateFullness() {
     fullness = (currentCalories/maxCalories) * 100 //calculate fullness percentage
    console.log("logging fullness", fullness);
}

eatFood(food) {
   currentCalories = currentCalories + food;
   updateFullness();
}
I moved the console.log message into the updateFullness function so that you can see what happens to fullness when you eat food. In my Codepen example, I have buttons that the user can click to eat the different kinds of food, but since I am sticking to Javascript for this tutorial there is another way you can call the function in the code for now.
Just like we called updateFullness inside the setInterval and eatFood functions, you can call eatFood by typing eatFood() and just adding whichever food you want to eat inside the parenthesis. That means eatFood(beans) would pass the beans variable into function.
If you throw in a couple of eatFood() functions at the top of your code, you will notice that your log statements will become problematic. This is because we don’t have anything checking for fullness being greater than 100 percent. We can fix this by adding an if statement inside the updateFullness function.
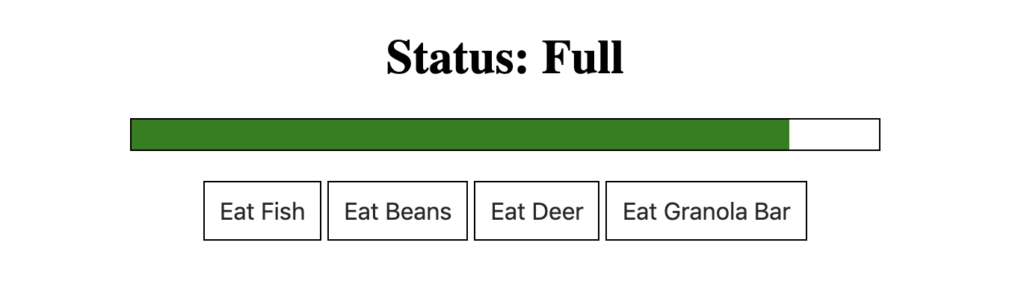
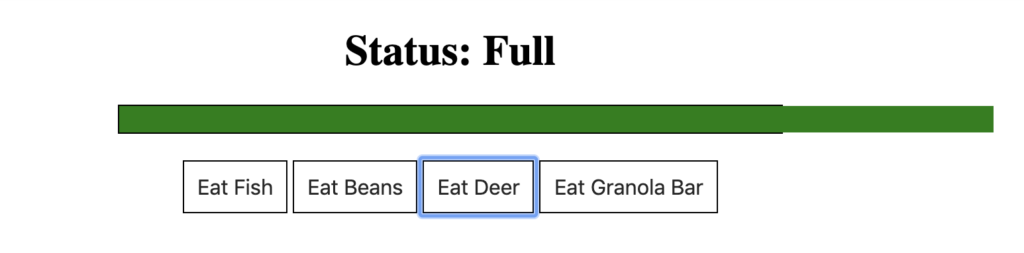
We don’t want this to happen, since you cannot be more than 100% full
This if statement will make it so that fullness gets updated to 100 if eating the additional calories would make fullness exceed 100 percent. Otherwise, the same calculation will be performed as usual. In my Codepen example, I also introduced a death state where if your fullness gets to 0 you can no longer eat food and your status displays as dead. The logic for that is very simple, just checking if fullness is 0 and then setting a variable dead to true. Then inside the eatFood function you add another if statement preventing currentCalories being added unless dead is false.
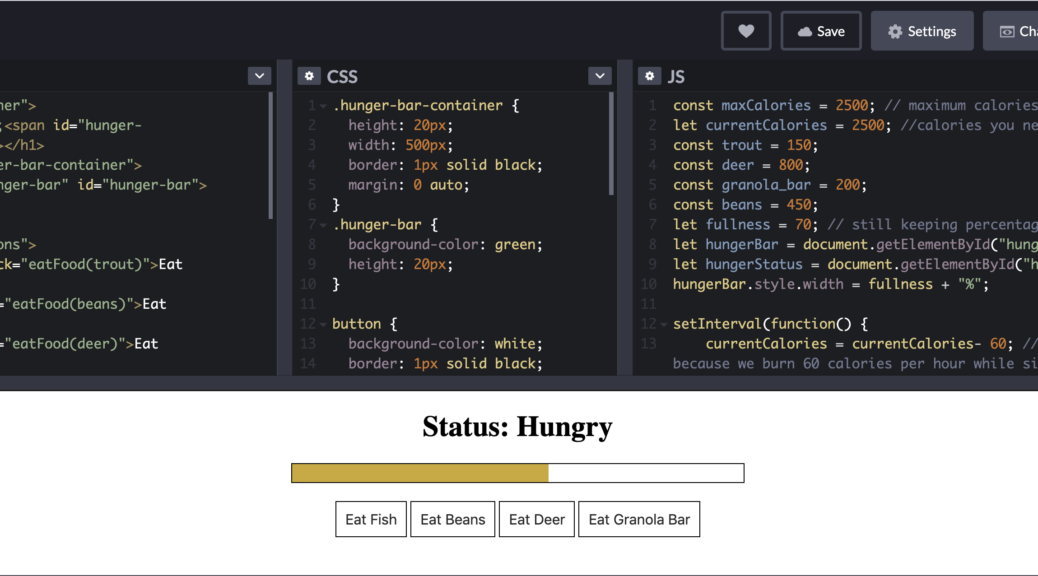
Another thing you will notice in Codepen is additional if statements for judging what to display for the current hunger status as well as for what color the health bar is. I’ve essentially added a simple GUI for users to interact with. If you want to add this functionality, check out these resources for creating a progress bar and buttons . The only additional Javascript that I am using is document.getElementById and changing the style and innerHTML of the selected element. You can read about that here and here.
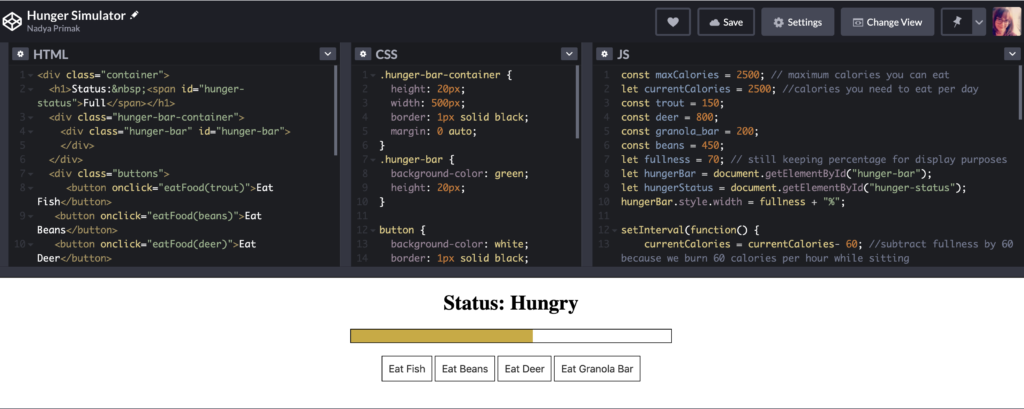
A screenshot of my Codepen example
There is a lot more you can do from here. You could create a hydration meter using some of the same code we already have. You could get closer to replicating the functionality from The Long Dark by adding a general health bar that begins to go down only when your hunger becomes very low. That would be more realistic since you obviously don’t immediately die when you didn’t eat 1 days worth of calories. I encourage you to explore what you can build on top of this code and can’t wait to see what you make! Hopefully this has helped give you some encouragement.
Hellblade: Senua’s Sacrifice is one of the most harrowing journeys into a mentally ill person’s mind that I have ever seen in a video game. If you haven’t played it, I highly recommend checking it out. You don’t even have to worry about getting addicted because the game has a concrete beginning, middle, and end. One of the unique aspects of Hellblade is a mini puzzle game that involves finding a shape in nature that matches a shape carved into the various runes in the world.
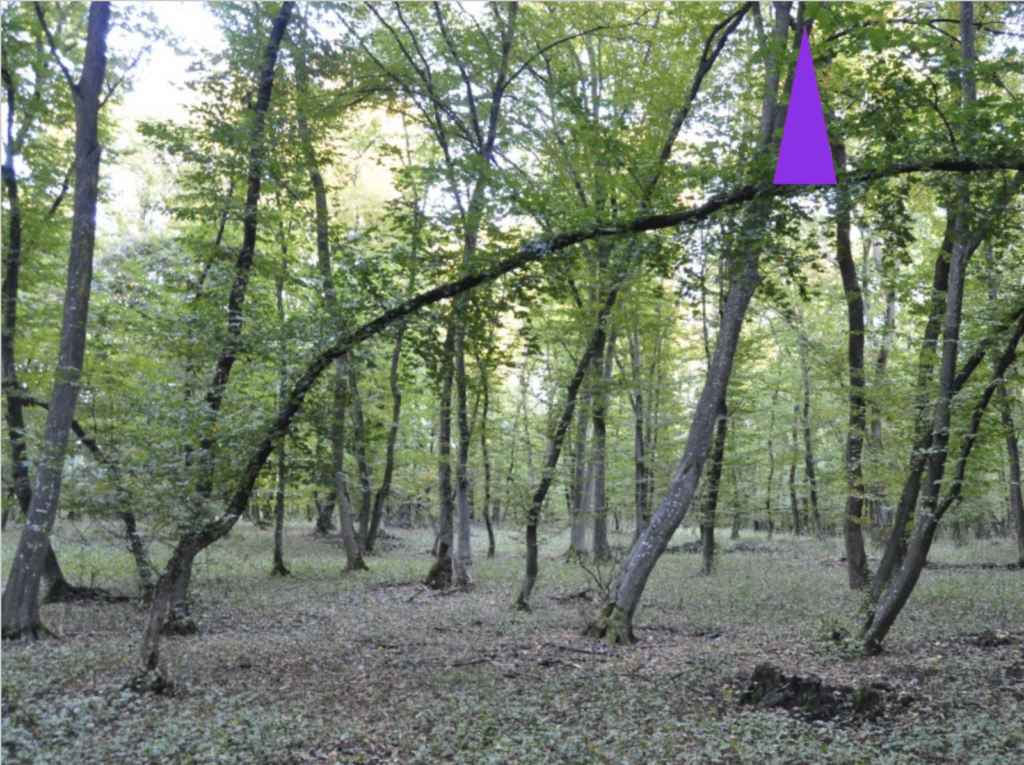
I decided to recreate a simple version of this mini puzzle game with Javascript in Glitch. You can look at it right away here or give it a shot yourself first. In this Javascript game tutorial we will be using HTML5 Canvas and vanilla Javascript, no fancy framework. We will load a background image of some trees and the user will control a triangle shape on top of it and try to find where the same shape can be found among the trees. When they hover the triangle shape in the right spot that matches up where the trees form that shape, the triangle will change color. You could use a more complex shape, but I wanted to keep it simple by using a triangle for this tutorial.
Thankfully the HTML is very simple, just two things we need to do. First we need to do is create a canvas element with <canvas> and give it width, height, and an id as shown below. The width and height should be roughly the size of our image. We will use the id to identify the canvas in Javascript. The entire game will pretty much happen within this canvas, which allows for advanced graphics manipulation that you cannot do with other HTML elements.
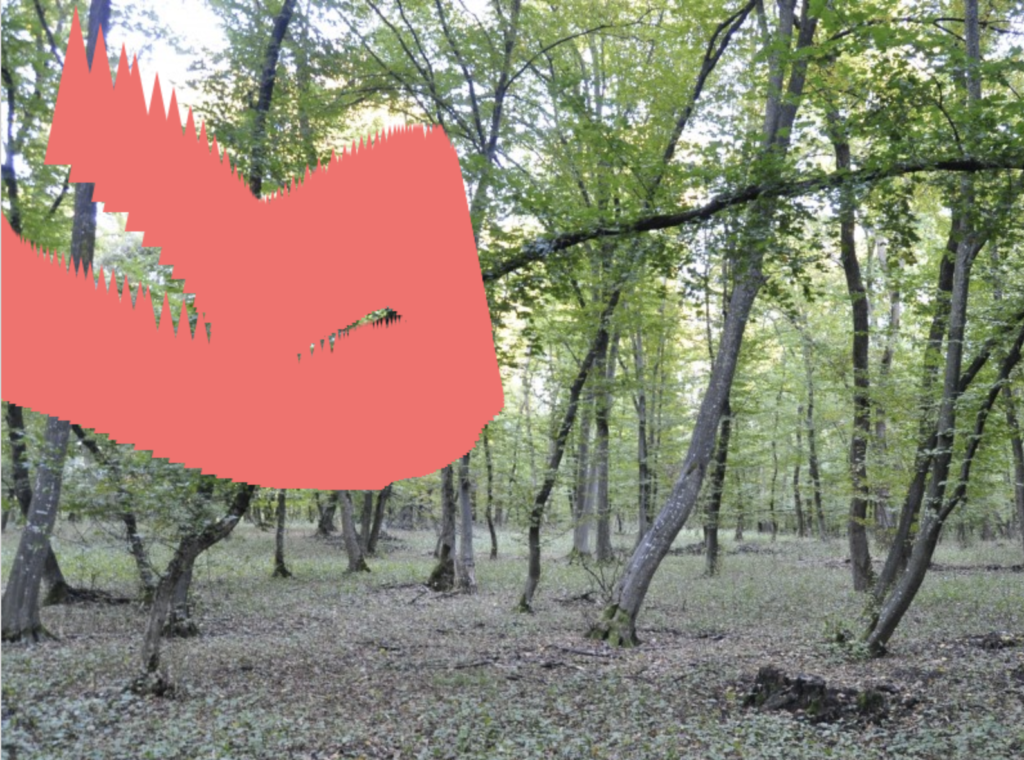
The picture we are using for this exercise
Second we need to add our tree background image so our canvas can access the image data. However I will also add a hidden class because otherwise we will see our image twice, since it’s going to appear inside our canvas. We want to give our image an id as well, since the canvas also needs to access it. I called it “trees” because well, its an image of trees. The below code will go inside your <body> tags.
<img id="trees" class="hidden" src="https://cdn.glitch.com/eb083ff0-5e3b-41d0-be19-711a1dcd89f5%2FDSC0063-1024x680.jpg?v=1589402686658"/>
canvas width="800" height="600" style="border:1px solid #d3d3d3;" id="canvas"></canvas>
<script>Our Javascript will go here, or in a .js file if you prefer </script>
Then in order to make your image be hidden, you will want to add this inside your <head> tags.
<style>
.hidden {
  display: none;
}
</style>
Worry not, even though the image is hidden our magical canvas will still be able to access the data to display it in all its beauty. Wonderful! Now our HTML file is set and we can focus on the Javascript. The first step is to identify our canvas and get the context, which is what lets us run functions to actually change what is displaying.
let context;
let img;
let canvas;

window.onload = function() {
  canvas = document.getElementById("canvas");
  context = canvas.getContext("2d");
  img = document.getElementById("trees");
  context.drawImage(img, 0, 0);
};
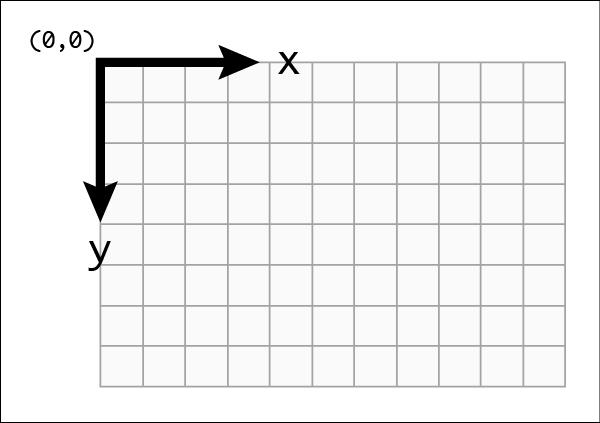
I’m declaring the image, canvas, and context variables at the top because we are going to need to access them throughout the code. Having a window.onload makes sure that we don’t try to fetch the canvas before it is loaded into our browser. In the first line of the function, we are getting our canvas, which we need in order to get our context. Then we are getting our image and drawing it to the canvas with context.drawImage. This function takes our image, and then the x and y coordinates (which start from 0 at the top left corner, so in this case our image will take up the whole canvas). If our context was in 3d space instead of 2d, we would also add a third value for our z index, the perspective plane.
So what’s next? Let’s think a little about what we data we need in order for this to work. So far all we have is our tree background image in a canvas. We want there to be a shape that the user can move around on top of the image. While allowing the user to drag the shape around would be nice, the easiest option is to just make the shape follow the user’s mouse around.
In order to do that, we will need to get the coordinates of the users mouse. This is actually the trickiest part, because canvas is not very sophisticated with the data it provides by default. We have to do some math to account for the location of the canvas on the window. The function below will do that for you.
function getPosition(el) {
  var xPosition = 0;
  var yPosition = 0;

  while (el) {
    xPosition += (el.offsetLeft - el.scrollLeft + el.clientLeft);
    yPosition += (el.offsetTop - el.scrollTop + el.clientTop);
    el = el.offsetParent;
  }
  return {
    x: xPosition,
    y: yPosition
  };
}
This function accepts the canvas element and returns the x and y coordinates of the canvas in relation to the browser window. We will call this function inside window.onload to get our canvas position, which will then be used to get an accurate mouse position. Don’t worry too much if you don’t understand all of it. If we were using another framework such as P5js this extra math wouldn’t be necessary at all.
The important part is next. We are going to add what’s called an event listener, which is a function that will get called every time the window detects a user interaction. We can define what user interaction we are listening for. In this case it will be moving the mouse. While we’re at it let’s also call our getPosition function to get our canvas position and add our mouse coordinate variables to the top, since we will need to access them soon.
let context;
let mouseX = 0;
let mouseY = 0;
let canvasPos;
let img;
let canvas;

window.onload = function() {
  canvas = document.getElementById("canvas");
  canvasPos = getPosition(canvas); // getting our canvas position
  context = canvas.getContext("2d");
  img = document.getElementById("trees");
  context.drawImage(img, 0, 0);
  canvas.addEventListener("mousemove", setMousePosition, false);
//the line above is listening for when the user moves their mouse, and will call the function "setMousePosition"
};
Olay so now we have an event listener but this code will not run because the function setMousePosition doesn’t exist yet. That is where most of the magic is going to happen. We will need to redraw our shape every time the mouse moves. We will also need to check if the shape is in the spot where it matches the pattern, so we can tell the user they have found it! You can add this function below window.onload.
The above code will get us the current coordinates of the users mouse on the canvas. We are passing in e which stands for the element that is being passed into the function, in this case our canvas element. The subtraction is happening to account for the offset of the canvas position on the browser window, as mentioned earlier. Now we can actually draw our shape!
function setMousePosition(e) {
  mouseX = e.clientX - canvasPos.x;
  mouseY = e.clientY - canvasPos.y;

  context.beginPath(); // tell canvas you want to begin drawing lines

  context.moveTo(mouseX, mouseY); // move where the cursor starts the line
  context.lineTo(mouseX - 25, mouseY + 125); // draw first line
  context.lineTo(mouseX + 25, mouseY + 125); // draw second line

  context.fillStyle = "#FF6A6A"; //set the color
  context.fill(); //fill shape with color
}
As you can probably tell from my comments on the code above , there are several steps to drawing a shape. First we have to tell the canvas we want to draw lines with context.beginPath and then we need to move our cursor. Since we want our triangle to follow the mouse, we move our cursor to the same coordinates.
I want my triangle to be a bit elongated, so when I define the end coordinates of my first line I want them to be just a little bit to the left (-25) and farther down (+125). To keep my mouse centered to the top of my triangle, I set my other line coordinates to be the same amount, but in the other direction on the x coordinate (+25). The final line goes back to our original coordinates, so you don’t need any additional code to complete the triangle shape. Now we can set the fill style to the hexadecimal code for a sort of salmon-y color. You have to call the fill function in order for that color to actually be applied to your shape.
That’s not right….
We’re getting close but if you run the code now you might see something is a little strange! Instead of having a triangle that follows our mouse we seem to be painting the canvas. That is because the canvas is constantly drawing more triangles every time we move our mouse and the canvas isn’t getting cleared. Luckily clearing the canvas is pretty easy.
function setMousePosition(e) {
  mouseX = e.clientX - canvasPos.x;
  mouseY = e.clientY - canvasPos.y;

// add the lines below

  context.clearRect(0, 0, canvas.width, canvas.height); //clearing canvas
  context.drawImage(img, 10, 10); //drawing our image again since that got cleared out

  context.beginPath();

    context.moveTo(mouseX, mouseY);
    context.lineTo(mouseX - 25, mouseY + 125);
    context.lineTo(mouseX + 25, mouseY + 125);

  context.fillStyle = "#FF6A6A";
  context.fill();

}
The clearRect function takes four values, x and y coordinates which define the upper left corner of the rectangle, as well as a height and width. If we provided something smaller than the canvas height and width only a portion of our canvas would get cleared, but we want to clear all of it. Of course this clears our image as well so we need to draw that back to the canvas again. This all needs to happen before we draw our triangle or it will get covered up by our image.
Now you should have a lovely little elongated salmon triangle floating around on top of our forest image, following our mouse obediently. There is only one thing left to do. We need to give the user some indication when they have “discovered” the pattern. There are a lot of fancy things that could be done here. We could display some text to tell the user they have found the pattern. We could add some fancy animation like in the actual Hellblade game. But for the sake of brevity and to give you freedom to experiment with canvas on your own, lets just change the color of our triangle. This code will be added to the bottom of our setMousePosition function.
Here we are checking our mouseX and mouseY coordinates to see if they match with the coordinates where we know our shape is in the image. You may notice there is a range of 5 pixels in both the x and y coordinates, because it is actually quite difficult to get your mouse on 1 or 2 specific pixels.
I took the liberty of figuring out the coordinates for the image in our tutorial, but if you want to do this with a different image or a different shape you will need to add some console.log statements to your mouseX and mouseY so you can gauge where the shape should change colors. I’m changing the color to a simple purple, though you can obviously change it to whatever color you choose. Check out my version on Glitch here.
Thats it! Hopefully you feel like you are one step closer to mastering Javascript. Now you can plug in any image and see if your friends can figure out if they can find the pattern. It’s obviously not too difficult with the shape and image I provided, but it can certainly be made more difficult with a larger image or a more unusual shape. I recommend checking out the following tutorials if you are interested in expanding your knowledge of drawing shapes and images with the canvas element:
In my last post I wrote about the first session of SpacyCloud’s Live Twitch stream from two weeks ago. The twitch stream was an all day event where the first half of the day consisted of a variety of workshops around creative coding topics, while the second half featured performances from various audio visualization artists and creative coders. Unfortunately I could not attend all the events, but I wanted to write in detail about both the Hydra event and P5JS event. You can read the P5JS post here. Now let’s dive into some live coding visuals!
The Hydra tutorial on SpacyCloud was taught by Zach Krall, a graduate student at Parsons School of Design with an impressive portfolio of projects. Though I had been experimenting with creative coding since college and knew about Processing, the language that P5JS was ported from, I had never heard of Hydra before. Just the fact that it was something new peaked my interest, but when I saw the home page for the Hydra-editor I was pretty much sold. Every time you load Hydra, a different visualization appears on the screen, with the code that wrote to make it overlaid on top. You can copy and paste the code, so in a way each new visualization is like its own mini tutorial.
Zach Krall’s personal website
It turns out that all of the coding for Hydra happens in the browser, and the background of the entire browser window changes to display the product of your code. Personally I prefer this over the two panel system that most web coding editors use, because when it comes to visualizations you want to be able to see them in as large a display as possible. However I could see some people not liking this, because the code is a bit harder to read, even though it does have a background color applied.
Hydra was created by Olivia Jack who wanted to build a visualization engine that took its inspiration from analog televisions. It did that and a lot more, because with Hydra you can connect to other machines and each output your own video stream that can then be modified by others.
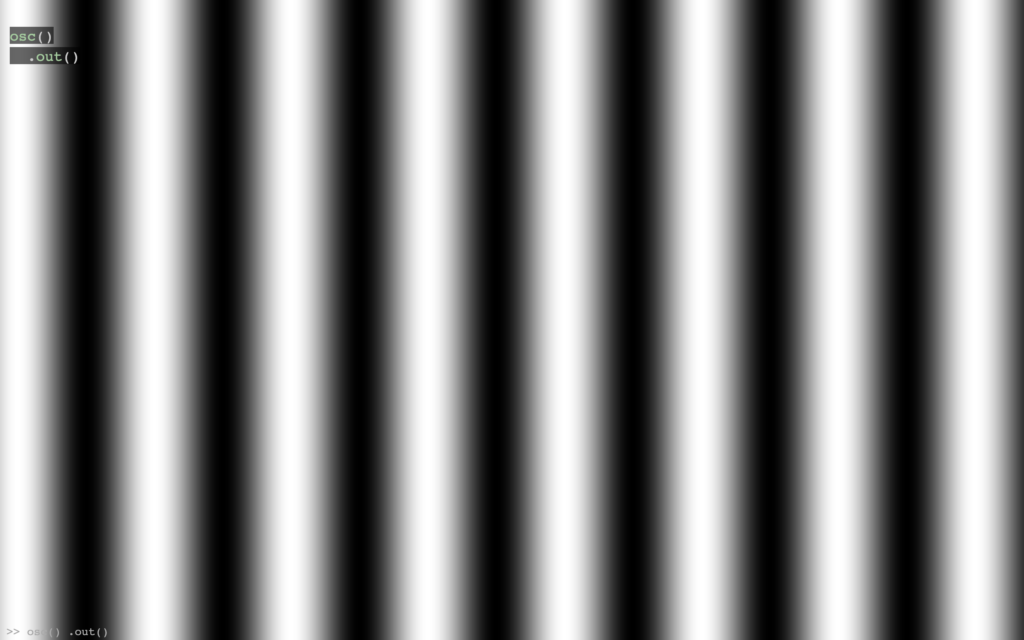
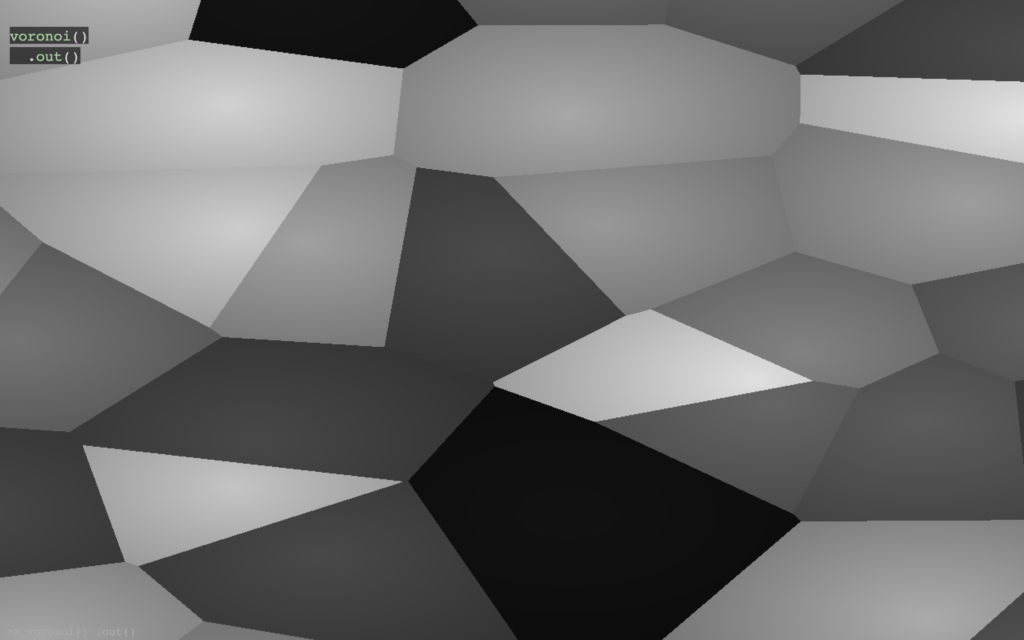
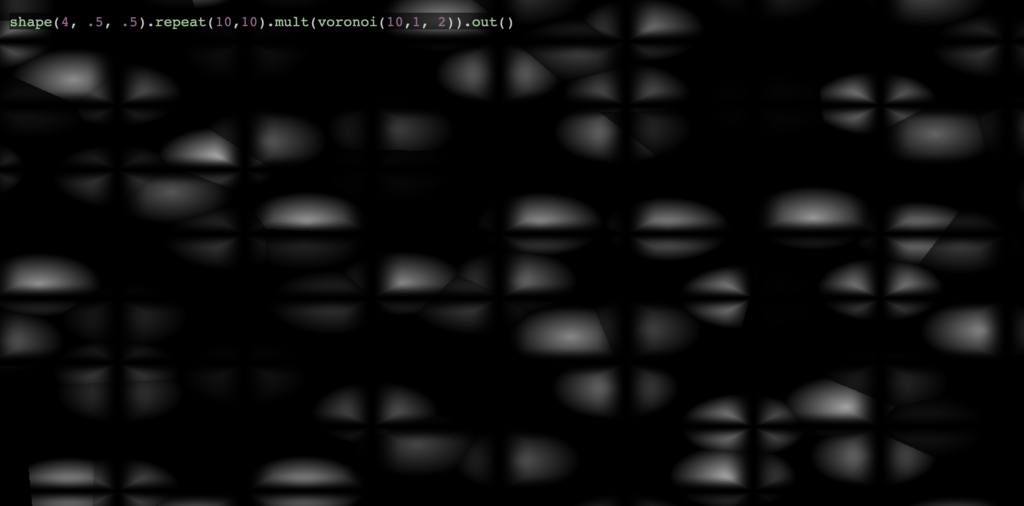
Probably the hardest thing about starting out with Hydra is wrapping your head around some of the paradigms, which are pretty different from your typical application. In Hydra, you typically start with a basic visual preset or texture, like noise, voronoi, or oscillation. Check out these basic visuals below. Note that while these screenshots are static, within Hydra all of these are moving visualizations.
A basic oscillation visualization is drawn to the browser with osc()A basic voronoi visualization is drawn to the browser with voronoi()A basic noise visualization is drawn to the browser with noise()
You can also pass values into the function to change it. For example, if I write noise(100) instead of just noise() the gray matter gets much smaller, like specks of dust rather than blobs. If you pass noise(100, 100) the specks of dust will start moving around the screen MUCH more quickly. The same can be said for voronoi and oscillation. First number defines the density of shapes, the second defines the speed of movement. Be careful passing in large numbers for the speed, it can be quite painful on the eyeballs.
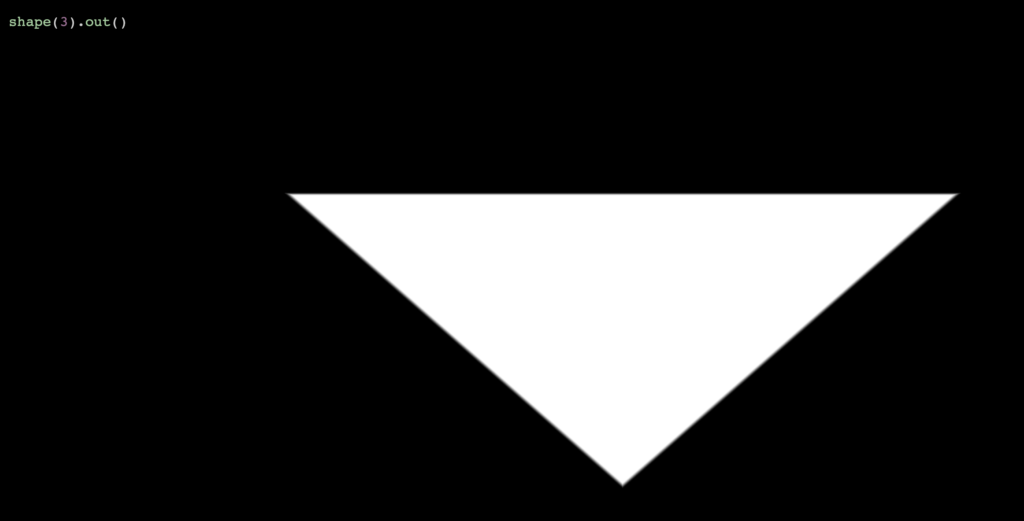
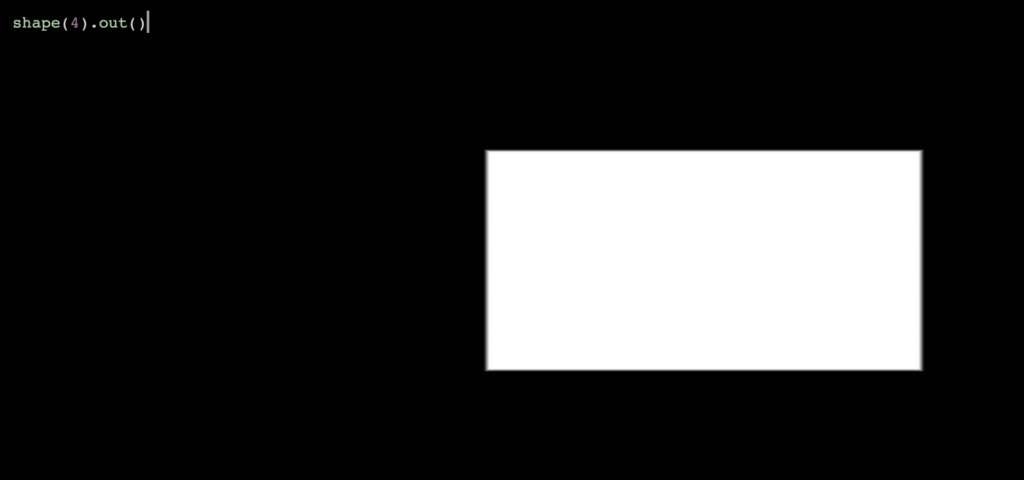
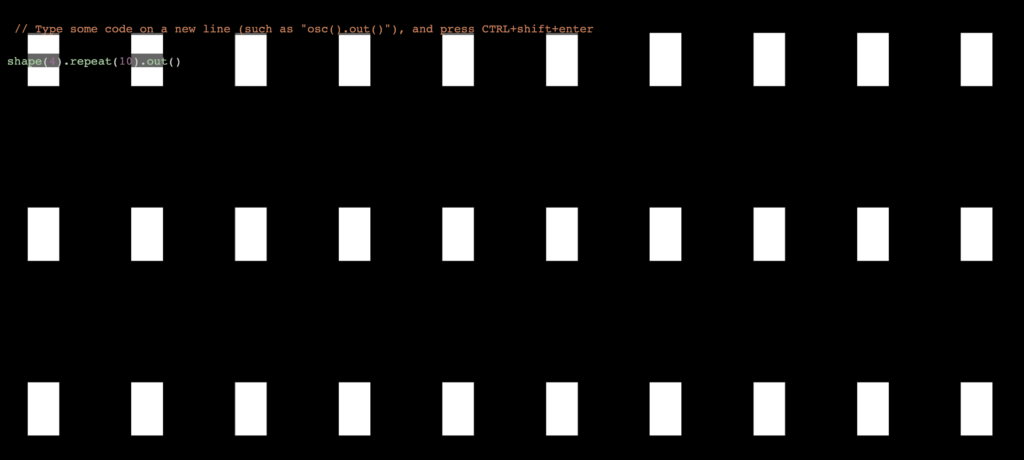
In order to execute the code you need to hit Shift + Ctrl + Enter on the keyboard. You might have noticed the code inside the screenshots include a second function chained on called out() . This function is basically telling the browser to output everything in front of it in the chain. If you remove out() nothing will render to the browser and you will only see a black page.
We’ve covered voronoi, noise, and oscillation. There’s one more basic render and that is shape(). Drawing a shape in Hydra is simple enough. The number you pass into the shape() function defines the number of sides for the polygon. So, shape(3) is a triangle while shape(4) is a rectangle, and so on.
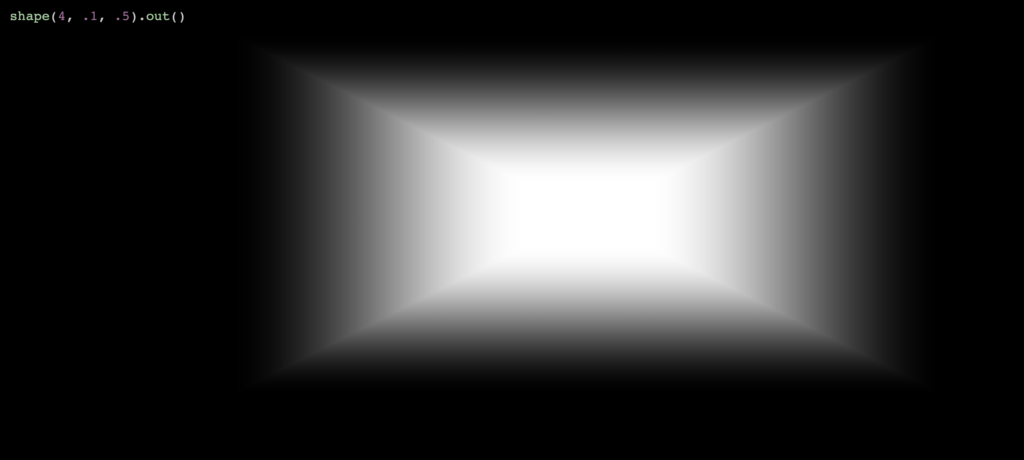
You can also specify how large each shape is and how blurred its edges are by passing in 2 more numbers into the function.
You might be wondering, what could one possibly do with a simple shape in the middle of the screen? That is hardly interesting to look at. I also thought it was a little bit odd that you couldn’t place multiple shapes or define that border and size of the shape like you can do in most creative coding languages. However, I was pleasantly surprised after some experimenting, as hopefully you will be too.
One of the easiest things to do is create a tile pattern with the shape. You can do this by chaining a repeat() function, where the numbers you pass into the function define how many times the shape is repeated.
If you write repeat(10,10) like in the screenshot above, you get the shape repeating ten times both in the vertical and horizontal directions. If you write repeat(10) then you will have the shape repeat ten times in the horizontal direction, but not vertical. This function is one of the geometry functions, which you can read more about in the documentation.
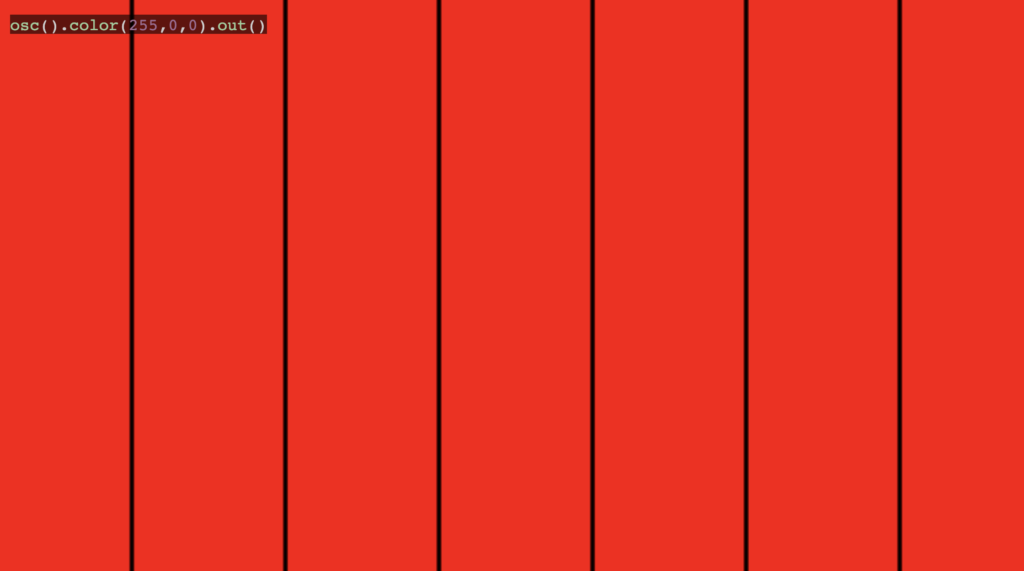
So how might you apply color to these shapes? If you were using voronoi, noise, or the other automatically generated textures, its very easy. You just chain a color() function where you pass 3 values corresponding to the amount of red, green, and blue.
A pure red oscillating texture
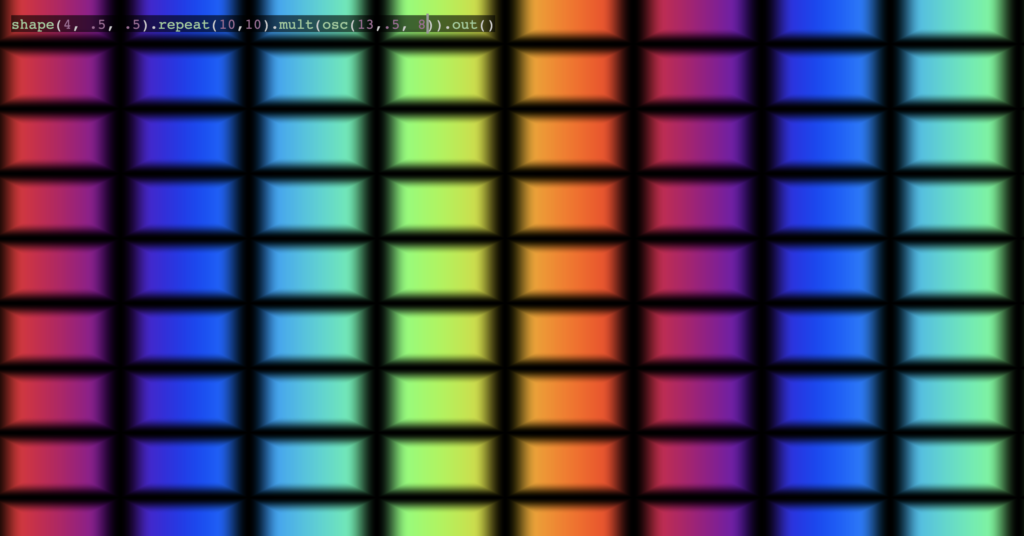
Because you cannot apply color directly to a shape, the workaround is to use a blending function with shape() and applying color within the blending function. For example, you can blend the red oscillator above with the rectangular tiles in the other screenshot.
Now you can see the rectangles are overlaid on top of the oscillating red texture. There are multiple blending functions, and each one has a different effect. I won’t go into detail on all of them because this post is getting lengthy and I am wary of the cognitive burden,
Suffice it to say there are 6 blending functions in total, called operators in the documentation. The other 5 are add, diff, layer, mask, and mult. If you’ve ever experimented with layer effects in Photoshop, some of these should sound familiar. Depending on the complexity of your visualization, these operators will sometimes output the same result. You are most likely to notice differences when using a range of color and texture.
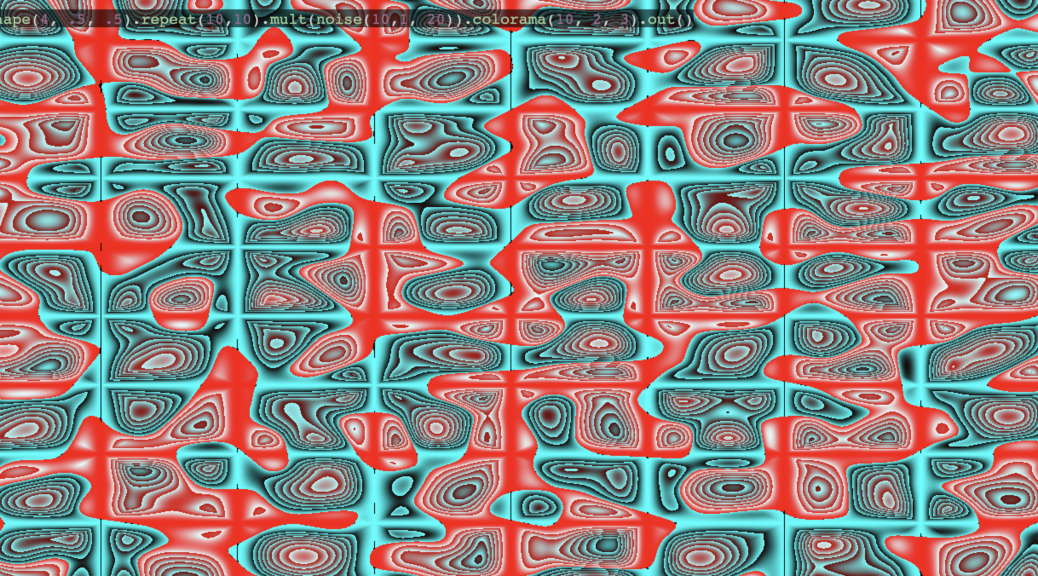
Let’s take the our oscillator and jazz it up a bit. Rather than using the color() function to apply a simple red color, you can actually pass 3 values into the osc() function directly. The first still specifies the number of oscillating rows, while the second specifies the speed they move across the screen, and the third specifies the range of color. Lets say we use the diff() operator and also tweak our rectangles by making them a bit larger and blurrier. What might that look like?
Now we’re cooking with gas. Just a few extra functions and things are much more interesting. There are many variables we can tweak to experiment even with this relatively simple visualization. For example, what happens if we change the oscillator to a voronoi or a noise generator?
Alright, so it looks like we lost the cool colors but got a more interesting texture in return. Are there other ways to bring back color besides the ones I showed? Absolutely! The colorama() function which brings all sorts of psychedelic fun. It’s the last function I wanted to demonstrate because it can spice up pretty much any visualization, and is probably the quickest to get interesting results with.
I hope by now you have the hydra-editor open in several tabs and have virtually lost interest in this post because you are too busy experimenting. Hydra is seriously one of the most absorbing and exciting creative coding tools I’ve had the pleasure of working with, and the goal of this post was to give you enough knowledge that you can hit the ground running.
Of course there is tons of material I couldn’t cover, and for that I want to leave you with a few references.
Hydra book is a very detailed guide that goes into pretty much every function Hydra has to offer, with lots of screenshots to help you along the way: https://naotohieda.com/blog/hydra-book/
Olivia Jack’s documentation is also nothing to shake a stick at, and has lots of coding examples that you can copy and paste to experiment with. There are also more Hydra tutorials listed here: https://github.com/ojack/hydra#Getting-Started
I had the immense pleasure of attending several creative coding workshops on April 4th. They were streamed live on the SpacyCloud Twitch channel. There were additional sessions involving Hydra, Raspberry Pi, Haskell, and more. However for this post I want to focus on the first session which was a P5.js tutorial. In this post I hope to translate the P5.js tutorial for beginners into a written format, for posterity and to share what I learned. I’m going to review what was taught in the live session. Hopefully SpacyCloud will have another live stream in the future so I can catch up on what I missed. Here is the landing page for the event schedule.
Although I have used Processing years ago when I was in college, I knew I was very rusty which is why I decided to tune into Leandra T’s P5.js tutorial stream. Originally branded as a creative coding language for artists, Processing is mainly used to create generative art, visualizations, and immersive installations. P5.js is basically a version of Processing that is ported to Javascript. Processing was developed my MIT and is built on top of Python. Naturally people wanted to be able to show their generative art online, so it didn’t take long for there to be a huge demand for Processing that worked with Javascript instead of Python. Since P5.js has taken off there is tons of code online that people are sharing, making it a lot easier to learn.
That being said, it’s still nice to have someone walk through every step with you. That is what Leandra did. After showing us an example of what we were going to make, Leandra dived right into the online P5 editor. Whats great about this editor is you can do all of your coding online and see the results of your code side by side. She went over some of the basic functions, such as setting the canvas and background, and drawing shapes.
In the above code (to be more precise, a screenshot from the aforementioned P5 editor) you can see two functions, setup and draw. The setup function is called once when the application first runs, while draw is called constantly every frame (at least 24 times per second). What that means is that while it looks like the circle is static, it’s actually being redrawn constantly. However our eye cannot perceive that so it looks as though the circle is always there.
As you might have guessed, createCanvas is only called once and the two numbers you pass are the pixel width and height of the canvas, respectively. The canvas defines the area within which you can draw. Inside the draw function, background is what defines the background color of your canvas. If you pass 1 number, you will get a shade of gray as if you passed 3 RGB (red, green, blue) values. That means that background(220) is just shorthand for background(220,220,220). Each value can be as high as 255 (white) or as low as 0 (black).
Then of course you have the ellipse. In the screenshot above there are only 3 values passed to the ellipse function: x coordinate, y coordinate, and radius. However, you can actually pass in 4 values, which is why the function is called ellipse rather than circle. Passing in 4 values means you can stretch or squish the shape because you are passing the x coordinate, y coordinate, width, and height.
So far this is pretty boring. Luckily, it only takes a few tweaks for things to get a lot more interesting. Instead of passing the ellipse static values you can pass in things like mouseX, mouseY, or random. Passing in mouseX to the first value of ellipse and mouseY to the second value will make it so that you are essentially painting circles across the canvas wherever you move your mouse, because the ellipse will follow your cursor. If you pass random instead, the computer will generate a random number every frame and draw the ellipse to those coordinates.
You need to at least pass random a maximum number, so that it knows the range within which the random number can fall. If you want circles to cover the whole canvas, you can use random(width) for the x coordinate and random(height) for the y coordinate because P5.js stores the width and height of the canvas to those variables. Also make sure you move background out of the draw function and into setup, otherwise you will only ever see 1 circle on the canvas because the background will continuously be drawn on top of it.
What the canvas will resemble when you pass in random(width) and random(height)Using mouseX and mouseY will be more like “painting” with the shape
Okay so now we’ve got lots of shapes on the canvas, but where is the COLOR?! Much like you can provide the background 3 values that reflect red, green, and blue you can do the same for shapes with the fill function. For example, if I pass fill(255, 0, 0) I will get a completely red circle like below.
But what if I pass random values instead? What do you think will happen?
Now we’re cooking with gas. Leandra went through similar steps in her live tutorial, to make sure everyone understood the basic principles and the most commonly used functions in P5.js. One of the most popular uses is to create visualizations that respond to sound. These are obviously a huge thing at raves and concerts, and they are easy and fun to make. The first step is to make sure you have the sound library linked in your P5.js editor.
On line 5 in the above screenshot there is a url pointing to p5.sound.min which is the P5.js sound library. If you click the little arrow above the code it expands to view the files that you see on the left hand side. Click on index.html and confirm that you also have the p5.sound.min script on line 5.
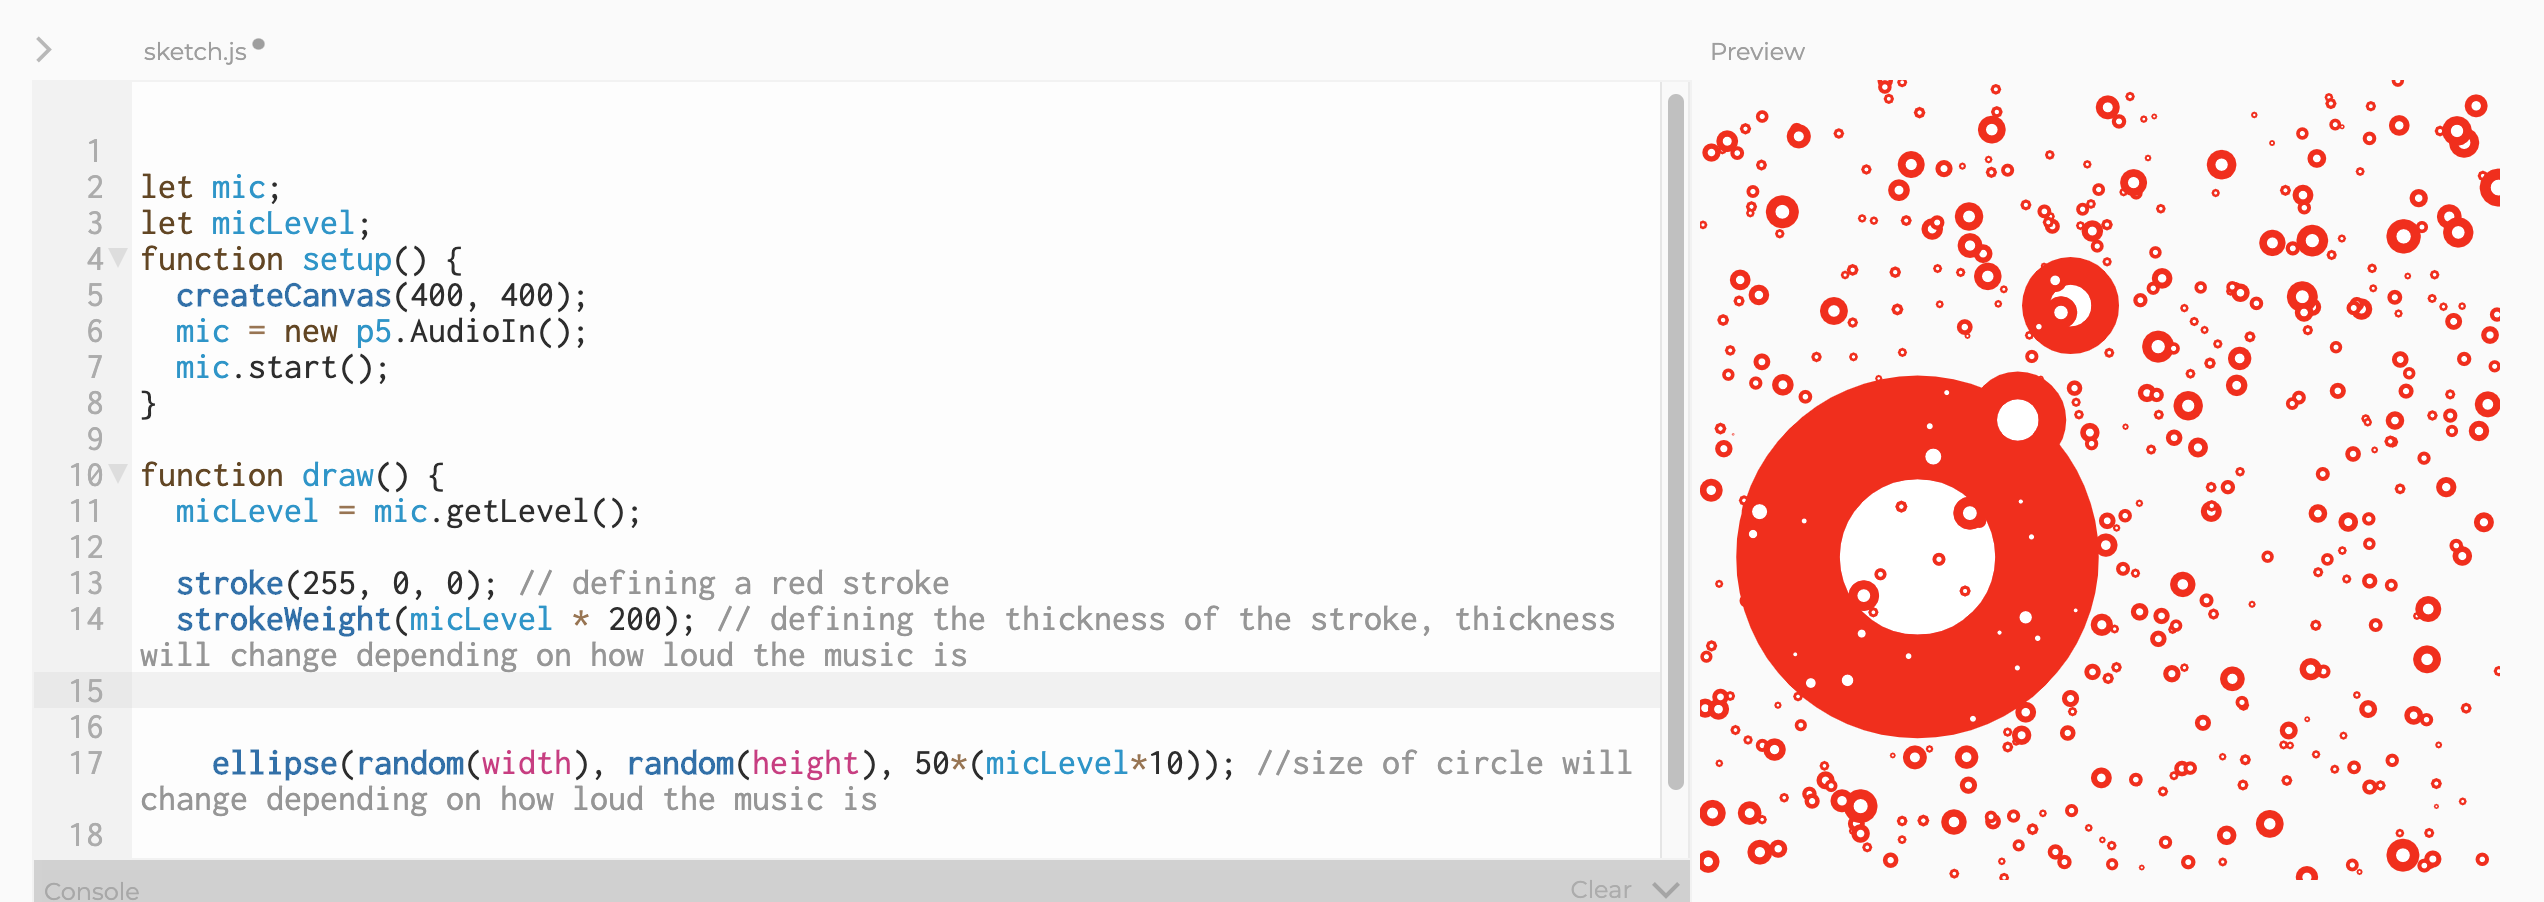
The next screenshot illustrates the additional code you will need in order to setup the mic and start receiving data from it that you can use for your visualization. Basically, you have to setup some variables at the top so that you can access your mic anywhere in the code. The variables start off empty but then you pass the actual mic in your setup function and start it so that it actually runs. Finally, you need to get useful data from the mic so you call getLevel to get the loudness which you can use for visualizations. You can confirm that the mic is working by adding a console.log statement so you should see values being returned below your code when you run it.
I know that my mic is working because I am seeing values in my console at the bottom
We’re getting really close now. Only a few more steps to go before the finish line. Now that you know your mic is working, you can try passing in the micLevel and playing some music to see how the visualization responds. You can also introduce a few more functions, such as stroke and strokeWidth. The role of stroke is to define the color of the border of your shapes. Like fill, you pass in 3 values for red, green, and blue. On the other hand, strokeWidth is for defining the thickness of the border. You can see an example below integrated with micLevel for some cool effects.
We’re at the final step. It’s going to involve a slightly more complicated programming concept, so bear with me. This concept is called loops, and in particular we are going to use a for loop. Basically you define a variable, like num, and that variable can increase or decrease until you reach a specified stopping point. Most of the time, for loops are used to count upwards by 1 to a designated end point. So a for loop like for(let num=1; num <= 8; num++) { console.log(num) } will output 12345678. Hopefully that makes sense. There is plenty of reading online about for loops if you are still confused.
Unfortunately it doesn’t look that cool in a screenshot. It will look much cooler for you when you actually have the code in P5.js yourself and play some jams! So first, let me put the code here so you can actually copy and paste instead of manually typing everything out. This was the exact code that was written in the original P5.js tutorial.
let mic;
let micLevel;
function setup() {
  createCanvas(400, 400);
  mic = new p5.AudioIn();
  mic.start();
}

function draw() {
  micLevel = mic.getLevel();
  background(5);

  stroke(255, round(micLevel * 800), round(micLevel*255));
  strokeWeight(micLevel * 200);


  for(let i =0; i < 6; i++) { // for loop counting from 0 to 6
    fill(random(250), random(100), random(255), 255); //1 circle is drawn with every loop, so 6 circles total

    ellipse(i*60 + 40, micLevel*5000 + random(50), 50); //micLevel for the y value caues the circles to go up and down with the volume, i*60 means a new circle is drawn every 60 pixels along the x axis
  }

}
I also tweeted out a video of my own code and music so if you don’t feel like it or don’t have time right now to tinker with the code here is a short video. Make sure you turn the sound on!
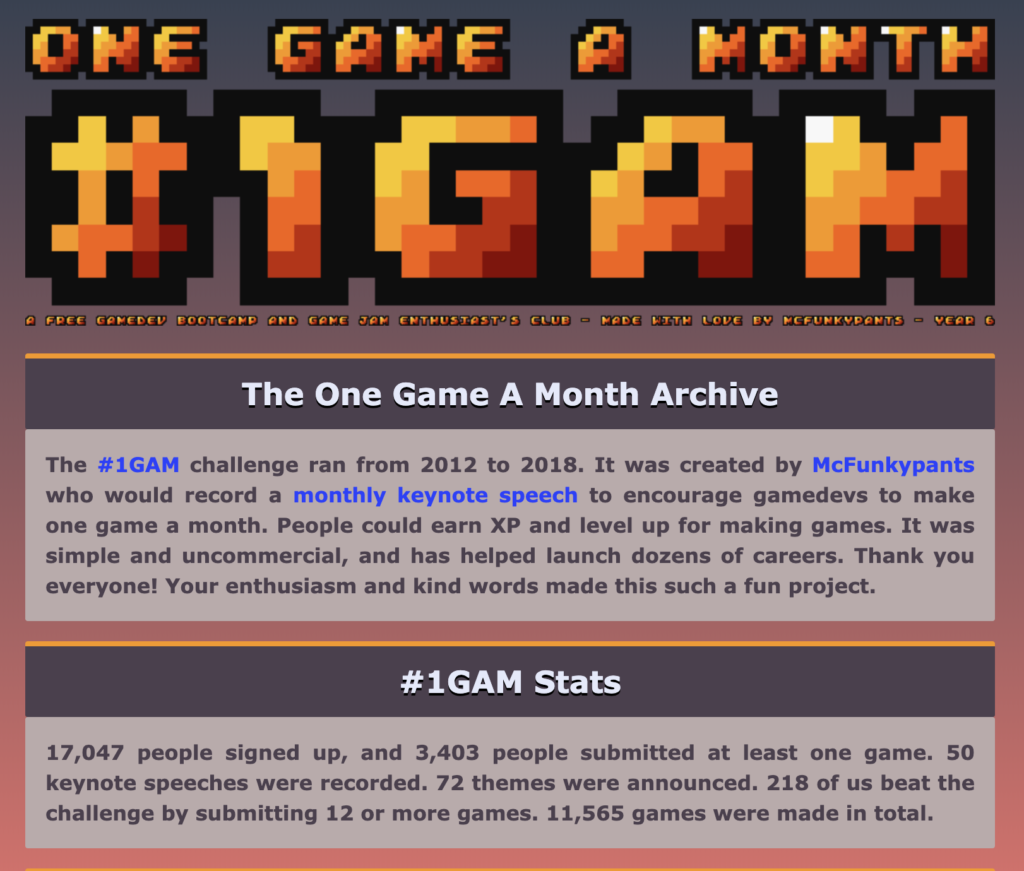
A popular challenge that beginner programmers participate in is called 100 Days of Code. Although I never participated in it myself, I see countless tweets with screenshots and progress reports of people sharing bits of apps they made. 100 Days of Code is a great way to keep people in the programmer mindset. It gets them familiar with what it is like to code every day. Still, I wonder if it is the best approach for everyone. For them, One Game a Month could be a great alternative.
I’m here to propose another approach, one that is gaining popularity in some game development communities. It’s called the One Game a Month challenge. Unlike the 100 Days of Code challenge, its designed to be undertaken for an entire year. Unlike the 100 Days of Code Challenge, One Game a Month allows you to take your time. Not necessarily write code every single day.
I know what some of you might be thinking. Well, there are a lot of other components that go into a game — you have to make art, and audio, and design decisions. That is naturally all true. Although, I would argue that adding this creative element to your coding adventures actually makes the whole thing a lot more fun. Especially if you’re a creative coder like me. But I don’t want to land a job as a game developer. I want to work at a hip startup disrupting [insert industry here]. I get that too.. but here is the kicker. I am a self taught programmer, and the majority of my portfolio consisted of – you guessed it- games.
There’s something that gets skipped over a lot when people talk about breaking into the software industry. It’s not necessarily about what type of product you show off. It’s about the coding language you use to make the product. And whether that language is one used by the startup you are applying to. It is very much possible to develop games with Javascript, and Javascript is also one of the most in demand languages.
Although the original one game a month challenge ended, more people have picked up the mantle to continue the hashtag on Twitter.
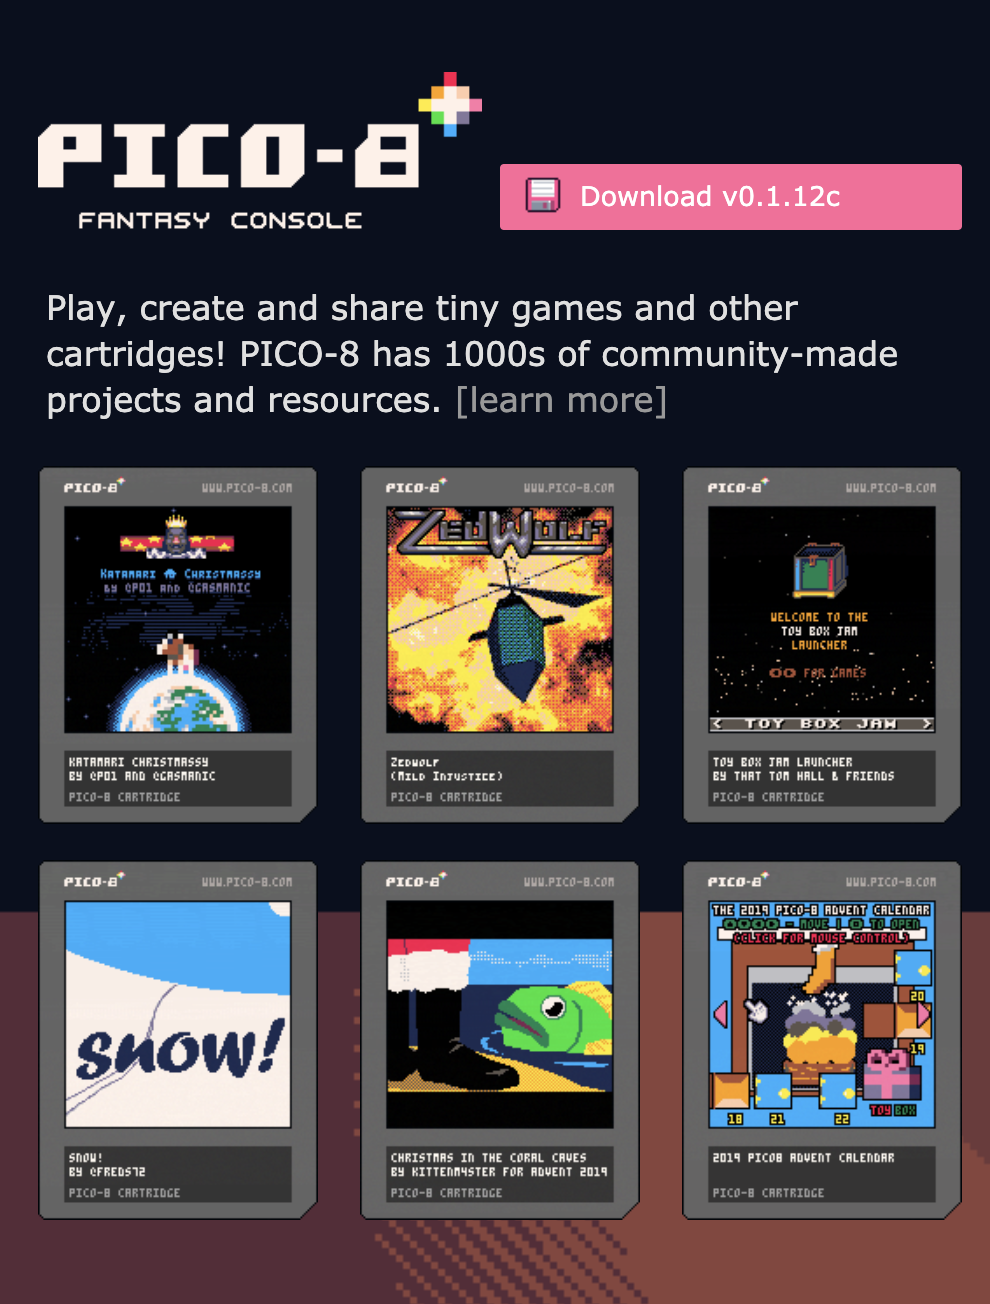
So back to my earlier point. One Game a Month gives you a challenge that you can work on more steadily. It also conjures (hopefully) more excitement than making another Reddit or Craiglist clone. There are even communities built around specific game platforms such as Pico-8, which are very generous with sharing their code and resources. Although Pico-8 runs on Lua, it bears a lot of similiarities to Python. Lua still teaches you the important data structures and logic that you need to know to become a programmer.
I can imagine some of you might still be skeptical. Maybe you want to see some real examples of games that were made with Javascript. I can understand if you’re not yet willing to buy into this “one game a month” thing. Here’s some different games that you can check out, starting from the easiest to the hardest to code:
Alien Attack: This game is good for getting your feet wet with Javascript, and isn’t too complicated. You have to guess the X and Y coordinates of an alien in order to shoot them. The blog post shows all the code involved in making the game.
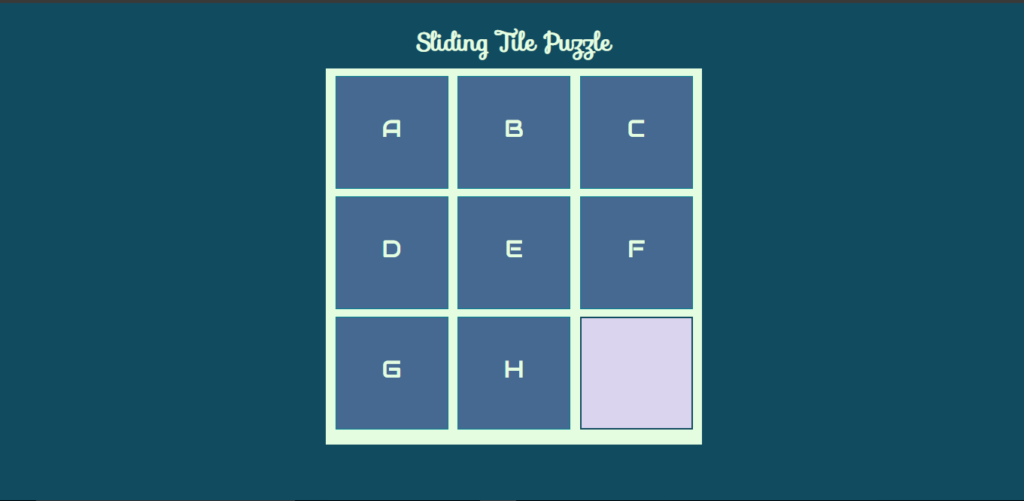
Sliding Tile Game: This game has a lot more Javascript, but is still fairly straightforward in terms of the logic. It’s a game where you have to get 8 tiles that are are scrambled back in the right order. But there is only one empty slot where you can move the tiles at any time. This blog post is extremely thorough in walking you through the game mechanics and how to figure out the winning state.
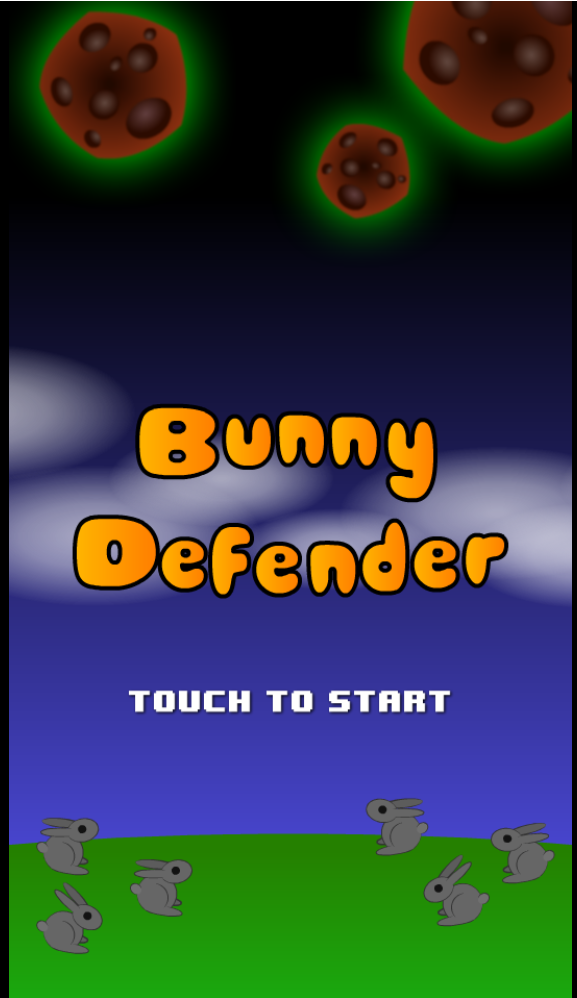
Bunny Defender: Unlike the previous two games, Bunny Defender requires using a Javascript game engine called Phaser. Getting comfortable with a Javascript game engine will make it easier to learn Jframeworks like React or Angular. So, it is a great step forward. It is a mobile game where you have to destroy asteroids trying to destroy a planet of bunny rabbits. You can find some examples of code for this game on Github, but the original tutorial to make the game was on Lynda.com.
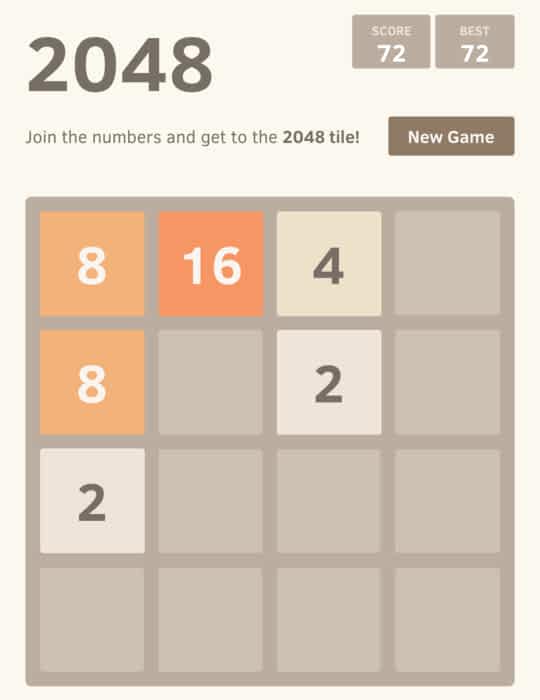
2048 : 2048 is another puzzle game where you use the arrow keys to move all of the pieces on the board in that direction. There are many examples of this game coded with different frameworks like Vue and React. Here are a variety of links below:
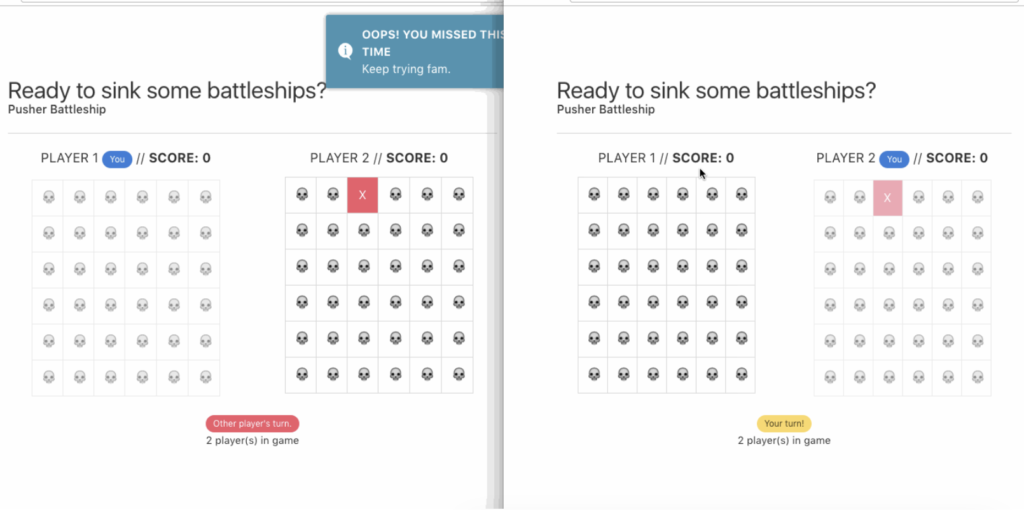
Multiplayer Battleship: This is a really advanced game that uses Angular and Typescript. I haven’t used this tutorial myself, but it seems comprehensive and a great fun way to get comfortable with a modern Javascript framework.
There are a lot of reasons to start making games to learn programming. Games are fun. They are the epitome of creative coding. Unlike to-do apps, games are something you are excited to show to your friend because it is something they will engage with. There is a misconception among some developers that games are difficult to code, and unapproachable to beginner developers. It’s also a great first language in coding for gamers.
I didn’t really get excited about learning to code until I started making games. As a creative coder, games have always been by far the most interesting to me. It’s quite possible I never would have become a software engineer if game development wasn’t one of the applications. As a kid games like Rayman, Zelda, and Donkey Kong filled me with excitement. I remember a feeling of joy when I finished a level or beat a boss that I wanted to shout it from the rooftops. With Pico-8, you will programming simple games, but some of them might remind you of those games from your childhood.
The fact that I have the skills to build games like that myself as an adult fills me with pride. That is because I know the kid I was before would have looked at the adult me with awe. Of course some days I forget about that when I am struggling with a frustrating bug. But at the end of the day it is the main reason I do what I do. We all have an inner child who we want to satisfy, after all.
It is possible today to learn all of the major programming concepts through making games. Although I did not do that myself, I think it would have made my experience much more engaging. My first real foray into programming was in college where I took a few programming classes, and some days it was a real drag.
Pico-8: The Perfect Platform
A year ago a friend showed me a game engine called Pico-8 for making minimalist pixel art games. I initially rolled my eyes at it, because I thought myself sophisticated making games in Unity. I thought that making games with Pico-8 was like advertising to the world that you don’t know what you are doing. Now I couldn’t disagree more.
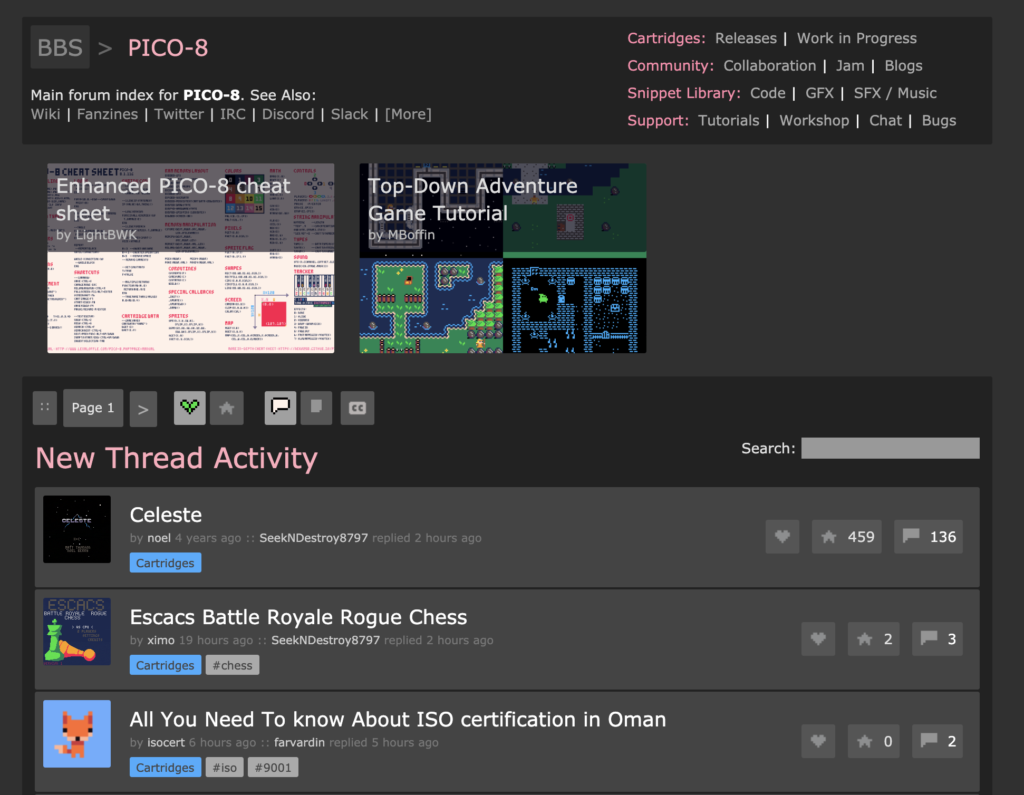
Every Game is a Pico-8 Tutorial
The first thing that is amazing about Pico-8 is the community. Every one is passionate about learning and sharing, and many members of the community make their own Pico-8 tutorial (s). There is such an incredibly giving and supportive network of folks who participate in the forums. They are also active on Twitter and Discord and beyond. In fact, some users even post Pico-8 code snippets as tweets!
Many software developers believe in open source and sharing their code on GitHub. But in the game development world it’s not so easy to get access to raw code. The AAA world obviously has every line of code concealed behind 10 page NDA agreements. Indie game developers tend to be cautious and perhaps paranoid about people stealing their game.
Thankfully, on Pico-8 that could not be farther from the truth. Every game uploaded to the website allows you to view the code right in the browser, right below the game window. You can copy and paste it right into your own game, no strings attached. That is another reason that makes Pico-8 an exceptionally good option for making games to learn programming.
Simple Coding Language
Pico-8 runs on an easy to understand programming language called Lua. If you’re looking for a Pico-8 tutorial, there are plenty to choose from. In many ways it resembles Python and doesn’t require and pesky semicolons or parentheses all over the place. It reads a lot more like English than a lot of other programming languages do.
Pico-8 also has limitations on the complexity of the logic in the game, which it counts with “tokens.” This forces people to simplify their games and keep the scope reasonable. That is great for beginning programmers. It helps to avoid temptation to code something the long way instead of looking for a solution with fewer lines of code.
Documentation and Tutorials
Programming languages, frameworks, and API’s live and die by their documentation. The quality of the documentation often goes hand in hand with the quality of the community. Since I already wrote about the community, you can probably guess what I will say next.
I bought a zine on itch.io which breaks down Pico-8 into its different parts. From explaining the user interface walking you through steps to build basic games, it covers a lot of ground. It’s the type of documentation which is not only thorough, but very beginner friendly.
Great Games
You might have similar thoughts to mine when you glance at your first few games on the Pico-8 platform. Certainly they aren’t going to blow you away with their graphics the way that some Unreal Engine games do. But believe it or not, there are some real gems and even best seller games that were made with Pico-8.
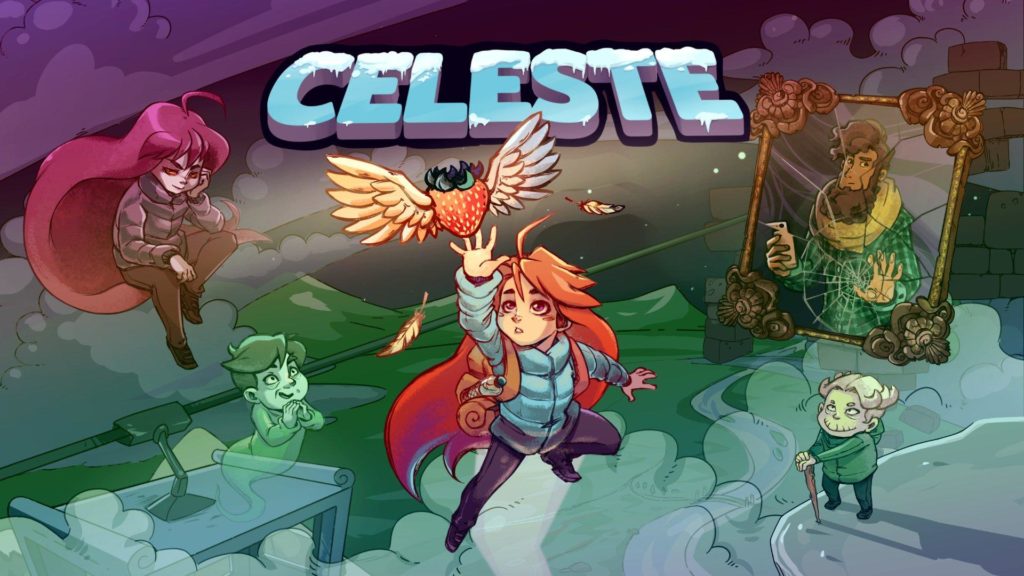
The most notable example is Celeste, a critically acclaimed platformer where the original prototype was built with Pico-8 in just four days. Beginning programmers should not expect to make a bestselling game. But it is encouraging to know Pico-8 is a platform where that is possible.
About a week has gone by since I published “Foot in the Door.” I intended to write a new post last week but there was so much marketing to do that I felt overwhelmed. This online oversaturated world we live in has forced us all to become marketers. We must shout from the digital rooftops in order to be heard above the din. That is usually a necessity for marketing your product, unfortunately.
My original cover, I changed it since then
Selling things has never been my strong suit, in fact I would say it is one of my biggest weaknesses. The only way I have gotten better at it is through slow and painstaking practice. Though I have had a Twitter account for years, I find it difficult to post every day and come up with witty retorts. My biggest successes in the past have always been when I took advantage of a young service or platform and been one of the early adopters.
When the Amazon KDP service was still young and most people thought self-publishing was a terrible idea, I uploaded a few of my short stories for free on the platform. Because there were so few items like that available at the time I received a tremendous number of downloads.
With this book I knew that wasn’t going to be an option. I wanted to work on building a list of subscribers for a newsletter. One where I could share the interesting creative coding content I come across every week. My research indicated that solo-preneurs benefit greatly from having their own email newsletter. Sadly, I had been putting it off for a while.
I also noticed providing free content in a landing page/email subscription being a common strategy across the web. I wanted this book to be accessible to anyone who wanted to learn to code. However, I felt that it would be counterintuitive and unproductive to charge people. Especially because the book is still quite short. I also knew from my past experience that my distribution would be reduced if I charged people for the book.
Though my main lane of distribution would be through my newsletter landing page, I decided a week after launch that it wouldn’t hurt to make a paperback version of my book available through the Amazon store. After all, I could order author copies and organize giveaways. Not to mention, Amazon had far wider reach than me. Might also grow my audience.
Being involved with the Women Make community of creative women in (primarily) tech was immensely helpful. The community helped to support each other during the month long “Just F*cking Ship It” Challenge. It also helped that I had already written a portion of the book a year prior, but lacked the motivation to finish it. Since my marketing skills are less than stellar, having my book included in the final product page when the challenge was over also acted like extra free promotion.
A screenshot from the Just F*cking Ship It Challenge Product Feature Page
Another way I shared my book was on Facebook groups. I found relevant groups related to creative coding, software engineers,learning to code, and women in tech. I wrote a paragraph about the book and shared the link. Then I made sure to tweak that paragraph of text. If it was a group for self-taught programmers, I made sure to mention I was self taught.
There are also several blogging platforms I re-post to, including Dev.to, Medium, and (more recently) Gamasutra. On Medium there are publications like “Code Like a Girl” that I submit to in order to extend my reach. These can be a toss up in terms of how much of the audience ever clicks the link back to my blog and discovers my free book.
Finally I made my first Product Hunt page, which was probably the most nerve wracking part of my marketing process. I love to browse Product Hunt and see all the curious, strange, wacky, and actually really useful and interesting applications makers launch on the platform.
The Product Hunt homepage
I did not end up getting featured on Product Hunt that day. But, I did get more upvotes than I was expecting and even a few followers. Also, Product Hunt gets a lot more visitors per day than my blog. So it’s still a great way to bring more subscribers and have another permanent backlink to book. There is also a search feature on Product Hunt. That means if people are searching for books about learning to code or breaking into the tech industry, they might very well come across mine.
So now for some stats! I believe in sharing data with other makers because that is how we all grow. So far I have 284 subscribers, a number I’m pretty happy with. That’s just 2 weeks after the release of my book. Of those 284, 54% have actually opened and clicked to download my book. I’m less happy with that number. However, I imagine because of filters and robots thats closer to the number of real people wanting to read my book.
A screenshot of my landing page performance from Mailchimp
I’m hoping to raise that number to 500 within the next month. Going to keep posting on social media regularly. Although Facebook gets the most clickbacks, I also share on LinkedIn, Twitter, and even Pinterest. I think so far I underestimated LinkedIn the most. I am happy I decided to give that platform a try.
Hopefully this data will help you as you work on marketing your own product. As makers I believe we should support each other. If you have something interesting to share that you are working on, you should post it in the comments! I look forward to hearing about it. If you want to keep up with what I’m doing, you can follow me on Twitter now @nadyaprimak. If you’re interested in learning more about my book, you can check out an excerpt here.
Below is an excerpt from my book about my journey learning to code and teaching myself after graduating from college with an art degree and little idea of what I was qualified to do next. I had taking some coding classes but I didn’t think I’d get any opportunities to be creative if I chose that career. For a while I thought I would be a designer, but I quickly learned that working with clients was not my cup of tea. That was when I discovered creative coding, and taught myself to code by making games.
There were a lot of people that helped me along the way but also times where I really felt like I could use a guiding hand to help me with some scary decisions. I hope that this book can act as that guiding hand for people who are just starting out their careers and are interested in tech.
Memories
My start in tech happened well before I actually had the title of “Engineer” or “Developer”. It started in a small town known primarily for being home to one of the most liberal (and most hipster) colleges in the country. I had mixed feelings about attending school there and was pressured in part by my parents to apply to schools in Ohio (they were moving there at the time).
Moving to Ohio meant leaving behind my friends and boyfriend (at the time) in Minnesota where I had gone to high school. We settled on Oberlin because it gave the opportunity to study lots of different things. At the time I was passionate about at least a dozen different things and had no idea what I was going to do for a career. Naturally I wanted to put off that decision for as long as possible, hoping I would figure it out during college.
I was always interested in technology, but before starting college (and also during a fair amount of college itself) my leanings were toward art and writing. That’s not to say I didn’t spend a ton of time in front of screens — my unofficial babysitters were my Gameboy, Nintendo, and PC running Windows 2000 —but as a kid my best friend was an extremely talented artist. Drawing together was one of our favorite past times. I loved to go to museums and could stare at my friend’s art for hours. I also loved to read and wrote numerous short stories in middle school, and wrote for my high school paper.
Basically, I was a creative generalist and loved all things that involved the imagination. However, my parents kept pushing me toward a practical path, because they were still struggling with their own careers and worried about employment options for creatives in the USA. Of course they were right to worry, since very few artists succeeded in getting their work into a gallery, let alone selling that work for enough money to make a living. However, I learned in my late teens that there was another option- which sounded much more practical than being a writer or an artist. It was an area of overlap between art and the internet, and it was called web design.
Technically I began learning to code a lot earlier than college, though I didn’t know it yet. I dabbled in web design during middle school and high school, when I participated in roleplaying forums and later decided to create my own which had a very generic look that I wanted to modify. Essentially it was just a monochrome colored forum with no background images or icons, and I wanted the forum to look like it was part of the website where I described the world the roleplay took place in. I wanted the design to fit the mood of the world.
Essentially I was using CSS to make these changes. Unfortunately it was back when there was no such thing as developer tools (which would allow you to see the CSS alongside the site and actually make modifications to see the visual changes in real time) and no documentation. So the level of frustration accompanied with something as benign as altering the background color was shockingly time consuming. Despite all that, I enjoyed the challenge and it was fun and rewarding to see my websites come to life.
By the time I was starting college I was thinking web design was a pretty likely career option. Then I found out that Oberlin does not actually have a design degree. What it did have was a creative writing degree, one of the best undergraduate creative writing programs in the country. If I had known that my future would be pretty much solely focused on web development, I probably would not have given Oberlin another glance.
Though I knew art was probably not much of a viable career, I thought maybe if I got into the creative writing program I could become a successful writer. All thoughts of design and technology basically went out the window at this point. There was still a part of me that hoped to become a bestselling author, and that snowflake wasn’t going to melt so easily. I suppose the snowflake never fully melted, since I am writing this book.
It took a number of events in college for me to revisit web design. The first was that I was never accepted into the creative writing program, the second was the economic recession which happened while I was at Oberlin, and the third was breaking up with my long distance boyfriend, who had a tendency to put down my technical skills because he was insecure about his own.
Even as I continued to take art and design classes, I began to wonder if it was the right path for me. I enjoyed aspects of it, such as the strategic thinking that was necessary to identify audience and tone. But the 2D limitations of the medium frustrated me, and my classmates and professors who were more interested in conceptual work didn’t always mesh with my desire to master craft.
I wondered if I could do more with design if I started learning how to code. I also wondered if a career in design was going to be sufficient to make a living wage. Hearing from friends and acquaintances that they couldn’t find a job didn’t help. The future was starting to look a lot scarier than it had before. It seemed that technology was a major threat to many other fields. Though I had never doubted this before, when I looked at designer portfolios online I could hardly find any that were made by beginners. I was extremely intimidated by the senior design portfolios that I came across, and wasn’t sure that I would have what it took to compete. I even considered transferring to another school.
It wasn’t until I got a job working for the Oberlin Office of Communications that some of my fear about post college life was assuaged. If you are in college or soon to be starting college, I highly recommend that you also find some sort of part time employment. I did all sorts of things and learned a lot about myself in the process, possibly more than I learned from all the classes I took combined.
I did some freelance work as a graphic designer, and this taught me how to work with people in different age groups and what it was like being in a client-contractor relationship. It also showed me that freelance work involved being very good at navigating different personalities and clearing up any confusion, while also putting your foot down repeatedly. In addition there was the age old mantra: the customer (or client) is always right. That meant that even if I knew a design decision might turn out to look poorly, I often had to make compromises for the sake of pleasing the client. It also meant that sometimes I might have to change something I was really proud of because the client didn’t like it.
Here is a list of some of the other jobs I took while in college: obituary writer, photographer, interviewer, dance instructor, and archives assistant. I hope this helps to illustrate that people come into tech from all sorts of backgrounds, and there is not one clear cut path. I’ve met women who used to be social workers, physical therapists, filmmakers, and everything in between.
Takeaways
Not everyone who enters programming goes to college. I went to college, but much of what I learned there did not directly apply to my future career. Non traditional students come from all sorts of backgrounds, and by talking about my degree I am not trying to imply that it is necessary to get a job as a developer. In fact, it is not necessary at all.
What is necessary, however, is a passion for learning. That is the main thing I got out of college, and the main thing that I think is important to understand for those thinking about entering the field. In front end development especially, there is a new framework to learn every couple of years. So feeling comfortable with learning to code and not hesitating to ask questions when you have them are crucial skills.
There are many ways to practice learning how to learn. As a non traditional developer, you will probably end up teaching yourself a lot of the skills to get your first job. It’s important to know what techniques help you learn best. I learned in college that it’s easier for me to master new information when I can translate it visually. In the absence of that, I learn better if I am writing my own notes as the teacher is talking, especially if I translate it into my own words.
Another important thing I learned in college was time management. Especially during my programming classes, which I talk about in the next chapter, I had to get pretty good at estimating how long the homework would take me, and stay disciplined on the weekends to get it done.
I don’t know if I would have had the discipline to get through my classes without the support of my professors. That is the nice thing about college: you get in-person mentorship and structure to get through your work. But there are plenty of students in college who spend their time at parties, neglecting their assignments, and simply failing to pass their classes. So obviously college is not the answer for everyone. It’s also very expensive, especially in the case of liberal arts colleges like Oberlin.
What I’m trying to say is that it’s important to get those basic skills and knowledge about yourself and how you want to approach learning to code before you sink in to any serious programming training–especially if you are considering something like a boot camp where you have to stay dedicated to your work for three months straight, with longer hours than your standard 9-5. Picking the right courses and learning approach is crucial, as my next story will hopefully illustrate.
My own husband experienced the problem of taking the wrong course for his learning style and sadly, never gave programming another chance since. He graduated with a degree in history and was feeling lost after college, not knowing what career to pursue. He took some classes in psychology in Cleveland and volunteered with Spanish-speaking immigrants at an organization downtown. I suggested that he try learning to code, because I knew he was determined and hard working enough (he now works as an attorney and graduated from Georgetown Law University).
I regret that I encouraged my husband to take the course without taking a more careful look at the content. The biggest problem was that the course switched gears dramatically halfway through, from teaching C to teaching Javascript, two completely different languages. For someone like my husband, who dislikes sudden shifts in general, this was devastating. He began to believe that learning to code was beyond him.
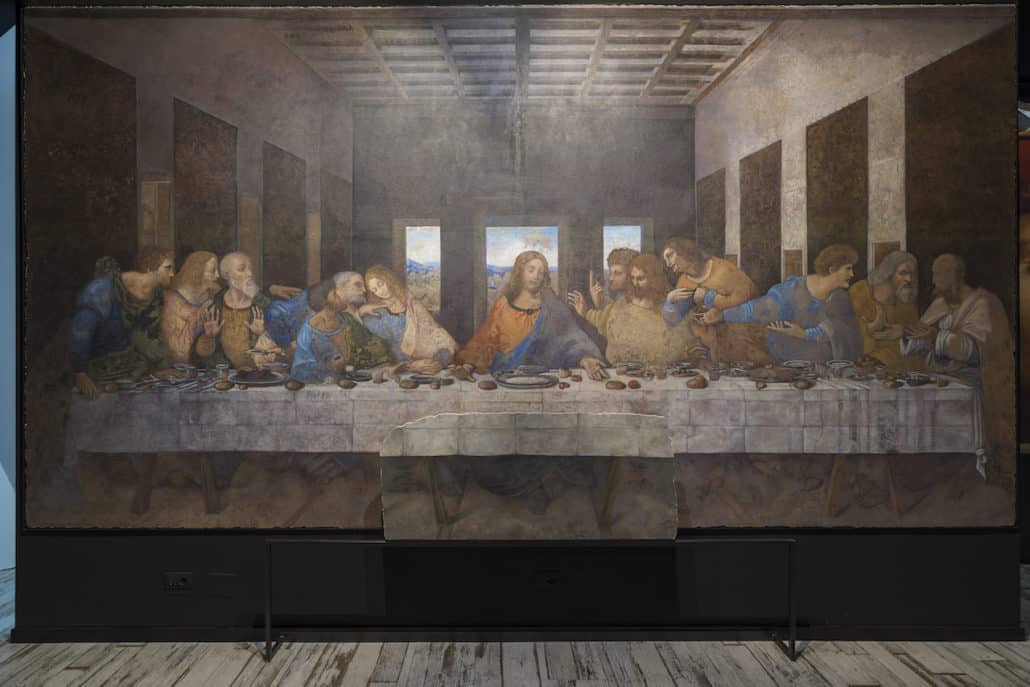
Apologies for the delayed post this week. I am in Italy on vacation and so getting the time to post has been less than easy. The first leg of the trip in Rome there was simply too much to see and do. Thankfully, now that we are taking it easy, I have time to sit down and write this. Everyone was telling my husband and I not to go to Rome in August because it is particularly hot, but the plus side is that all the hotels are extra cheap and there are less tourists than usual. One of the things that fascinated me the most in Rome was seeing a Leonardo da Vinci exhibit near our hotel at Piazza Poppollo.
The da Vinci exhibit got me thinking about a lot of things. I actually picked up a biography about the man which I am still reading through today, and it is immensely fascinating. However, I didn’t need a book about his life to identify da Vinci as a multi-passionate individual, so it was easy for me to understand his interest in many different fields, from science to nature to art. The Ted Talk by Emilie Wapnick (I also linked to it in a previous post) described Leonardo da Vinci perfectly. He kept over seven thousand notes in his journals, jotting down everything from to-do lists to random observations to inventions to drawings of everyday life. If da Vinci got bored with one research project, he switched to another with equal fervor. The man also became fascinated with the most random things, such as the tongue of a woodpecker. This led to many perceiving him as weird.
A photo from the Leonardo da Vinci museum in Rome This picture includes real miniature models of his inventions built with wood.
Society recognizes da Vinci as a genius with insatiable curiousity and incredible talent. The sheer amount of inventions and artworks featured in the exhibit blew me away. Yet a thought kept nagging at the corner of my mind. The more I read about the man, the more I wondered. If da Vinci had been born in the 21st century, would we still regard him as a genius? Would globalization and the internet be a hindrance or a help? Would the world even know his name?
I believe that if da Vinci was born in the 21st century, nobody would have ever known of his genius. While the internet may at first seem a boon to a man like da Vinci, it is also a rabbit hole for endless distraction. We know from descriptions written about him by friends that da Vinci was a distractable man. The man had many inventions tossed aside, such as scuba diving gear that was never usable by an actual diver. Luckily for him, this didn’t mater because there was plenty of other things for da Vinci to learn and discover. There was no need to spend a decade deep diving into a subject like specialists do today. That is because 500 years ago most subjects didn’t have much material to learn yet. After all, fields like medicine, natural science, and psychology were just being defined at that time.
Another image from the exhibit.
There is another reason I believe society would not recognize da Vinci as a genius in the modern day. That is marketing. Combining globalization with the internet means we have a world where everyone is competing for attention. I doubt marketing would have appealed to him. I definetely can’t imagine him devoting time to analzying Google’s search algorithm. Not when there are so many other interesting things to learn and discover. People learn marketing because they want to be seen and discovered. Yet da Vinci was only discovered because he was commissioned by wealthy patrons to make art and invent devices. Because of the money he earned, he could afford to pursue his curiosities. This was mentioned several times in the exhibit. This is what he really wanted.
Obviously there is no way to prove to you for sure if da Vinci would be recognized by society as a genius in the 21st century. The broader point I wanted to make is how much more difficult it is today as a multi passionate individual. Every field today has specialities with sub specialties on top of them, and most of them takes years to master. The only way to master multiple specialties is to become a workaholic, such as Musk who famously stated he works 120 hours a week. That is not sustainable, or healthy. Ultimately, being born as a multi-passionate individual in the 21st century can feel like being dealt a tough hand.
Even the famous Last Supper began disintegrating quickly because da Vinci used an unverified experimental technique.
Still, I like to think we can take some solace in the fact that, even someone as brilliant as da Vinci might have been overlooked in todays information overloaded world. At least for me, when I am feeling insecure, I find it a comforting and reassuring thought.
There are thousands of indie game developers all over the world who make games. But, only a fraction of those developers have any experience working with a game publisher. I was one of those developers when I saw an opportunity to work for a start up that published educational games. I submitted my game portfolio to the company and was accepted shortly after. It was a super exciting moment. I couldn’t wait to start working with a game publisher on a legitimate platform.
Unfortunately, my experience working with the company was less than ideal. Perhaps there were some warnings early on, but I did not know what signs to look for. Also, the company seemed eager to share information with me about how to complete the project successfully. They set up a video call with me and e-mailed me the PowerPoint that illustrated the requirements needed. They immediately gave me access to the platform where other developers submitted their games so I could get some inspiration for what game I should make.
game development feels like everything is on fire and all you have is an eye dropper to put it out very very very very slowly
I immediately noticed many of the games submitted through the platform were very simple. This made sense, because there was a requirement to complete the game in three months. Still, I felt pretty confident I could make a game that was more interesting. There was a clear incentive for making the games more engaging. Developers were paid by the percentage of users who play their game.
What I didn’t realize, and what wasn’t made clear to me, is that the game I built had to work seamlessly on an internet browser on older iPads. This was the reason that the games I saw on the education platform were so basic. Unfortunately, during my on-boarding the technical aspects of just how simple my game needed to be were not discussed. I had no idea that I could not have a three dimensional game where you could move a character around an environment with arrow keys because the iPads running Chrome could not handle rendering at that frame rate.
It can be difficult to export a game to an iPad or the web by itself, but both at the same time? VERY DIFFICULT
It was a huge blow to my motivation and excitement about game development when the testers reviewed my game. They said that it was unplayable on the required platforms. It was also a shock because I had been using the testing platform provided by the company many times. Before I submitted the game I played through it on the testing platform religiously. It seemed very counter-intuitive for the company to provide a testing framework if “passing” the test didn’t actually mean it would run on the final system.
I attempted to re-factor my game by reducing the complexity. For starters, compressing the graphics and simplifying the 3D models in the environment. After another round of testing I realized that there was no way my game would work within a web browser on an iPad without making huge changes. I had only a few weeks left at this point.
Some of you may be wondering why I didn’t create a build of the game and run it on an iPad myself. The problem was that the game had to connect to the companies proprietary API’s, and those API’s were only designed to run on the companies domain where the testing platform was. To make matters worse, their API also didn’t run on an iPad — only a computer.
A brief video preview of my game, Grand Canyon Adventure.
In retrospect, I can’t help but wonder if the company was trying to take advantage of eager indie developers. The kind who are too new to know how to distinguish a sketchy arrangement from a legitimate one. I was one of those developers, who trusted that the information I needed to succeed would be provided to me. Maybe it was disorganization and mismanagement on the part of the company that made the technical requirements unclear. Regardless, the result was the same.
I wanted to share this story because I’m sure there are other indie developers out there looking for contracts to prove their capacity and get their work seen by more people. It’s an admirable goal, and far be it from me to discourage any indies from doing that. However, its important to be aware that many companies take advantage of indies eagerness to get professional experience. I wish I had done more research and asked more questions before diving into making the game. Hopefully this post will help those of you reading to be aware of some of the pitfalls. Especially in cases where you are working with a publisher that has very specific rules about the types of games that they accept.
It was not a lack of motivation or excitement about making the game on my part. I read through the rules, visited the forums, and took time to explore the platform the company used. Sadly, I had pretty much completed the game before I learned it would not be publishable on the platform..
Spending three months on a game that ended up not returning any profit is bad enough. Whats worse is the bad taste is still there an entire year later. I can only imagine how much worse it would have been if I signed a contract for a year. I know this has happened to other developers. It is my sincere belief that the industry needs to do a whole lot better. Especially in terms of making the technical limitations transparent, without taking advantage of indie developers passion.
My itch.io page for Grand Canyon Adventure
Even though my game didn’t get accepted while working with the game publisher, I decided to publish my game publicly on itch.io instead. After all, it is a shame to work on something and have it sit unseen on my hard drive. It’s an educational game for middle school students where you navigate a boat through the rapids of the grand canyon. You earn points by collecting gems and answering questions about erosion.
Are you an indie developer? Have you had any bad experiences working with a game publisher, on educational games or otherwise? I would love to hear from you in the comments.
Thanks for reading and feel free to follow me on Twitter @nadyaprimak where I talk more about game development, art, technology, and more.