Before I became a programmer I loved to play games. I played games for many years before I even knew the most basic concepts about coding. However these days I see that people are trying to introduce their kids to programming and looking for ways to make programming concepts more approachable. I think that using existing games people love is a great way to do just that. That is why I wanted to start this new coding for gamers blog series.
How to Build the Hunger Bar in The Long Dark

If you are reading this you might already have at least some interest in The Long Dark, and may have played it. But I will briefly explain the game just in case. The Long Dark came out on Steam several years ago and had a beta release that was primarily a survival simulator. The game takes place in the Canadian far north where a mysterious phenomenon has caused all of the power to stop working.
In the original simulator, your goal was essentially to survive as long as possible by staying hydrated, nourished, rested, and avoiding freezing to death. You could choose between different environments to try your luck in, some which have a range of man made shelters and some which have nothing but a few caves dotting a barren landscape teeming with aggressive wildlife.

By releasing a minimum playable version of their game early, The Long Dark developers gave players something to continually look forward to and give valuable feedback on as they added more features to create something truly spectacular. Now the game has a fully fleshed out story mode with multiple seasons and difficulties in addition to special challenges. Whether you’re developing a game or an application for a startup, the idea of slowly adding on features and polish over the course of time is the most logical and sustainable way to build a good product. It goes to show that when you learn to code with games like The Long Dark, you might be surprised by how many lessons will transfer over from games to other types of development.
It goes to show that when you learn to code with games like The Long Dark, you might be surprised by how many lessons will transfer over from games to other types of development. Examining games from a developers perspective and extracting a feature to recreate can also help you get into video game coding, so it’s a win win.
While its good to talk about strategy and general practices like building off of something small, I want to get into actual coding in this post. After all you can’t learn to code with games unless you actually write some code! In particular, I want to show you how we can take a feature from a game like The Long Dark and try to replicate it with Javascript code. I suggest starting with something simple, like a hunger meter. We could define a variable like fullness.
let fullness = 100;Why fullness and not hunger? Certainly nothing is stopping you from calling the variable whatever you want, but in my mind it is easier to call it fullness because then I can set it to 100 and know that means “completely full.” Whereas if I used hunger, I might be confused. Does 100 mean 100 percent hungry? Hunger doesn’t make as much sense to measure by percentage as fullness.
In The Long Dark, you get hungrier the longer you don’t eat. That means we need something to measure time. Since it’s a video game, time also goes by a lot faster than in real life. So let’s say every 30 seconds translate into 1 hour. We could use a Javascript function like setInterval that would get called every time 30 seconds have passed. You can read more about the function and test it out here. Note the double slashes in the code below indicate comments.
let fullness = 100;

setInterval(function(){
   fullness = fullness - 5; //subtract fullness by 5 percent
   console.log("logging fullness", fullness);
}, 30000); // 1000 is 1 second (in milliseconds)
By assigning fullness the value of itself minus 5, I am essentially decreasing fullness by 5 percent. Then I am logging out the new fullness value to the console, so I can confirm that my function is working. Having to wait 30 seconds to confirm my function is working can be a little bit annoying, so you can reduce the number of milliseconds to 1000 temporarily for testing purposes.
If you’re using a coding editor in the browser such as Codepen (I’ll be including a Codepen link a little further down) the console can be opened up by clicking on the “console” button in the bottom left corner of the editor
So now we have a fullness value that decreases over time, but what about eating? In The Long Dark you can eat all sorts of things. If you scavenge you can find canned beans, peaches, even dog food (ew) to eat. Or you can go fishing or hunting. Each type of food has a different number of calories which affect how much your fullness meter gets filled.

For now, let’s just create four foods. A granola bar, some canned beans, a pound of deer flesh, and a rainbow trout. Let’s say 200, 450, 800, and 150 calories respectively.
const trout = 150; //use const to declare a variable when you never change the value of the variable
const deer = 800;
const granola_bar = 200;
const beans = 450;
Now you might be thinking we have a problem, and you would be right. If we are counting our fullness as a percentage and our food in calories, how will we add them together? Looks like we will have to make some changes to our existing code, after all. The average man needs to eat about 2,500 calories per day. For the sake of simplicity, let’s say that is the number that constitutes 100% fullness.
const maxCalories = 2500; // maximum calories you can eat
let currentCalories = 2500; //calories you need to eat per day
let fullness = 100; // still keeping percentage for display purposes
const trout = 150;
const deer = 800;
const granola_bar = 200;
const beans = 450;

setInterval(function(){
   currentCalories = currentCalories - 60; //subtract fullness by 60 because we burn 60 calories per hour while sitting
   fullness = (currentCalories/maxCalories) * 100 //calculate fullness percentage
   console.log("logging fullness", fullness);
}, 30000); // 1000 is 1 second (in milliseconds)
Above you can see I’ve added two new variables, maxCalories and currentCalories, which make it very easy to do our math in setInterval to calculate the fullness percentage. Just divide currentCalories by maxCalories and multiply by 100. We also are subtracting 60 calories every 30 seconds because that is how many calories we burn per hour when we are sitting. Now we are ready to add an eatFood function. This one should be very simple. Just updating currentCalories, right?
eatFood(food) {
   currentCalories = currentCalories + food;
}
At first glance this would seem to be enough, but ultimately we will want to display the fullness data and update it every time currentCalories changes. In that case, it makes sense to create a function for updating fullness as well, to avoid rewriting the math multiple times. Let’s take a look at the whole thing again (minus the variables).
setInterval(function(){
   currentCalories = currentCalories - 60; //subtract fullness by 60 because we burn 60 calories per hour while sitting
   updateFullness()
}, 30000); // 1000 is 1 second (in milliseconds)

updateFullness() {
     fullness = (currentCalories/maxCalories) * 100 //calculate fullness percentage
    console.log("logging fullness", fullness);
}

eatFood(food) {
   currentCalories = currentCalories + food;
   updateFullness();
}
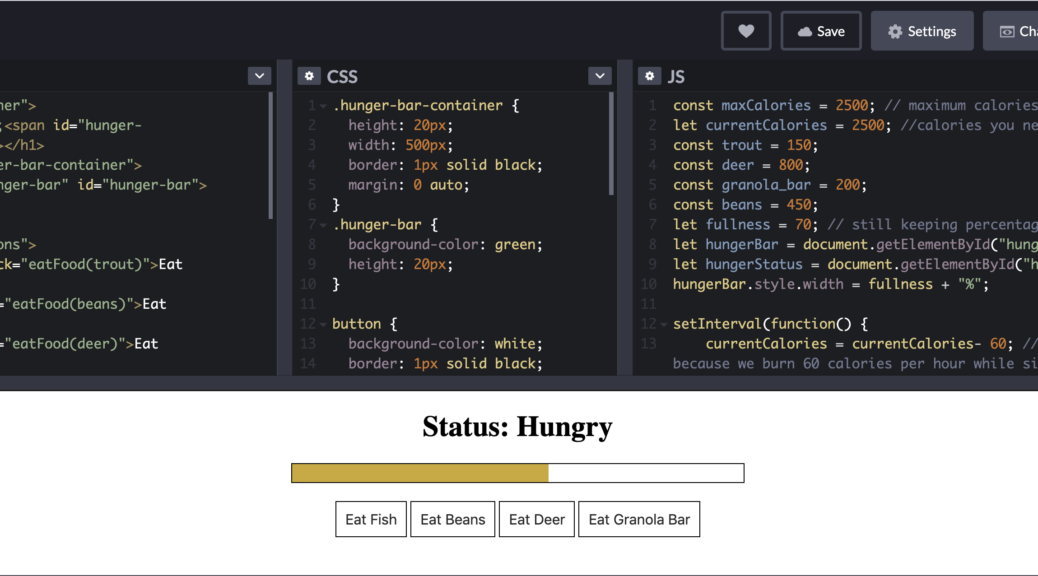
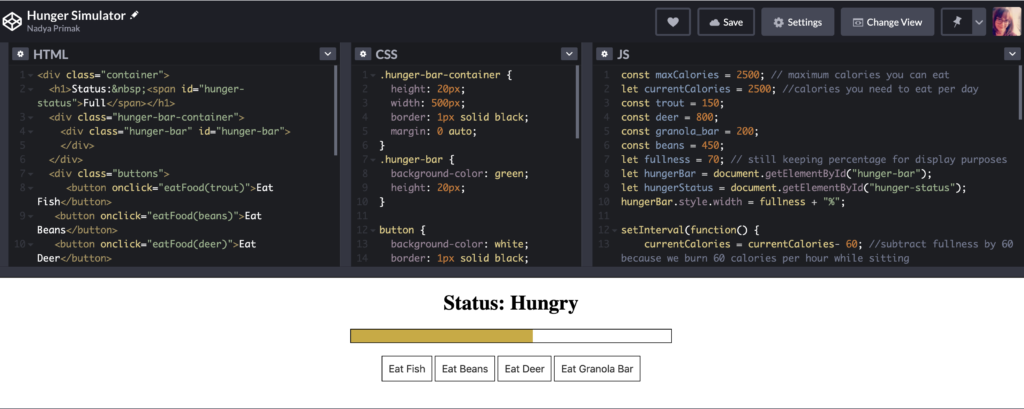
I moved the console.log message into the updateFullness function so that you can see what happens to fullness when you eat food. In my Codepen example, I have buttons that the user can click to eat the different kinds of food, but since I am sticking to Javascript for this tutorial there is another way you can call the function in the code for now.

Just like we called updateFullness inside the setInterval and eatFood functions, you can call eatFood by typing eatFood() and just adding whichever food you want to eat inside the parenthesis. That means eatFood(beans) would pass the beans variable into function.
If you throw in a couple of eatFood() functions at the top of your code, you will notice that your log statements will become problematic. This is because we don’t have anything checking for fullness being greater than 100 percent. We can fix this by adding an if statement inside the updateFullness function.

updateFullness() {
    if( (currentCalories/maxCalories) * 100 <= 100) {
        fullness = (currentCalories/maxCalories) * 100
    } else {
        fullness = 100;
    }
    console.log("logging fullness", fullness);
}
This if statement will make it so that fullness gets updated to 100 if eating the additional calories would make fullness exceed 100 percent. Otherwise, the same calculation will be performed as usual. In my Codepen example, I also introduced a death state where if your fullness gets to 0 you can no longer eat food and your status displays as dead. The logic for that is very simple, just checking if fullness is 0 and then setting a variable dead to true. Then inside the eatFood function you add another if statement preventing currentCalories being added unless dead is false.
Another thing you will notice in Codepen is additional if statements for judging what to display for the current hunger status as well as for what color the health bar is. I’ve essentially added a simple GUI for users to interact with. If you want to add this functionality, check out these resources for creating a progress bar and buttons . The only additional Javascript that I am using is document.getElementById and changing the style and innerHTML of the selected element. You can read about that here and here.
There is a lot more you can do from here. You could create a hydration meter using some of the same code we already have. You could get closer to replicating the functionality from The Long Dark by adding a general health bar that begins to go down only when your hunger becomes very low. That would be more realistic since you obviously don’t immediately die when you didn’t eat 1 days worth of calories. I encourage you to explore what you can build on top of this code and can’t wait to see what you make! Hopefully this has helped give you some encouragement.
How to Build the Rune Gate Puzzle in Hellblade: Senua’s Sacrifice

Hellblade: Senua’s Sacrifice is one of the most harrowing journeys into a mentally ill person’s mind that I have ever seen in a video game. If you haven’t played it, I highly recommend checking it out. You don’t even have to worry about getting addicted because the game has a concrete beginning, middle, and end. One of the unique aspects of Hellblade is a mini puzzle game that involves finding a shape in nature that matches a shape carved into the various runes in the world.
I decided to recreate a simple version of this mini puzzle game with Javascript in Glitch. You can look at it right away here or give it a shot yourself first. In this Javascript game tutorial we will be using HTML5 Canvas and vanilla Javascript, no fancy framework. We will load a background image of some trees and the user will control a triangle shape on top of it and try to find where the same shape can be found among the trees. When they hover the triangle shape in the right spot that matches up where the trees form that shape, the triangle will change color. You could use a more complex shape, but I wanted to keep it simple by using a triangle for this tutorial.
Thankfully the HTML is very simple, just two things we need to do. First we need to do is create a canvas element with <canvas> and give it width, height, and an id as shown below. The width and height should be roughly the size of our image. We will use the id to identify the canvas in Javascript. The entire game will pretty much happen within this canvas, which allows for advanced graphics manipulation that you cannot do with other HTML elements.

Second we need to add our tree background image so our canvas can access the image data. However I will also add a hidden class because otherwise we will see our image twice, since it’s going to appear inside our canvas. We want to give our image an id as well, since the canvas also needs to access it. I called it “trees” because well, its an image of trees. The below code will go inside your <body> tags.
<img id="trees" class="hidden" src="https://cdn.glitch.com/eb083ff0-5e3b-41d0-be19-711a1dcd89f5%2FDSC0063-1024x680.jpg?v=1589402686658"/>
canvas width="800" height="600" style="border:1px solid #d3d3d3;" id="canvas"></canvas>
<script>Our Javascript will go here, or in a .js file if you prefer </script>
Then in order to make your image be hidden, you will want to add this inside your <head> tags.
<style>
.hidden {
  display: none;
}
</style>
Worry not, even though the image is hidden our magical canvas will still be able to access the data to display it in all its beauty. Wonderful! Now our HTML file is set and we can focus on the Javascript. The first step is to identify our canvas and get the context, which is what lets us run functions to actually change what is displaying.
let context;
let img;
let canvas;

window.onload = function() {
  canvas = document.getElementById("canvas");
  context = canvas.getContext("2d");
  img = document.getElementById("trees");
  context.drawImage(img, 0, 0);
};
I’m declaring the image, canvas, and context variables at the top because we are going to need to access them throughout the code. Having a window.onload makes sure that we don’t try to fetch the canvas before it is loaded into our browser. In the first line of the function, we are getting our canvas, which we need in order to get our context. Then we are getting our image and drawing it to the canvas with context.drawImage. This function takes our image, and then the x and y coordinates (which start from 0 at the top left corner, so in this case our image will take up the whole canvas). If our context was in 3d space instead of 2d, we would also add a third value for our z index, the perspective plane.

So what’s next? Let’s think a little about what we data we need in order for this to work. So far all we have is our tree background image in a canvas. We want there to be a shape that the user can move around on top of the image. While allowing the user to drag the shape around would be nice, the easiest option is to just make the shape follow the user’s mouse around.
In order to do that, we will need to get the coordinates of the users mouse. This is actually the trickiest part, because canvas is not very sophisticated with the data it provides by default. We have to do some math to account for the location of the canvas on the window. The function below will do that for you.
function getPosition(el) {
  var xPosition = 0;
  var yPosition = 0;

  while (el) {
    xPosition += (el.offsetLeft - el.scrollLeft + el.clientLeft);
    yPosition += (el.offsetTop - el.scrollTop + el.clientTop);
    el = el.offsetParent;
  }
  return {
    x: xPosition,
    y: yPosition
  };
}
This function accepts the canvas element and returns the x and y coordinates of the canvas in relation to the browser window. We will call this function inside window.onload to get our canvas position, which will then be used to get an accurate mouse position. Don’t worry too much if you don’t understand all of it. If we were using another framework such as P5js this extra math wouldn’t be necessary at all.
The important part is next. We are going to add what’s called an event listener, which is a function that will get called every time the window detects a user interaction. We can define what user interaction we are listening for. In this case it will be moving the mouse. While we’re at it let’s also call our getPosition function to get our canvas position and add our mouse coordinate variables to the top, since we will need to access them soon.
let context;
let mouseX = 0;
let mouseY = 0;
let canvasPos;
let img;
let canvas;

window.onload = function() {
  canvas = document.getElementById("canvas");
  canvasPos = getPosition(canvas); // getting our canvas position
  context = canvas.getContext("2d");
  img = document.getElementById("trees");
  context.drawImage(img, 0, 0);
  canvas.addEventListener("mousemove", setMousePosition, false);
//the line above is listening for when the user moves their mouse, and will call the function "setMousePosition"
};
Olay so now we have an event listener but this code will not run because the function setMousePosition doesn’t exist yet. That is where most of the magic is going to happen. We will need to redraw our shape every time the mouse moves. We will also need to check if the shape is in the spot where it matches the pattern, so we can tell the user they have found it! You can add this function below window.onload.
function setMousePosition(e) {
  mouseX = e.clientX - canvasPos.x;
  mouseY = e.clientY - canvasPos.y;
}
The above code will get us the current coordinates of the users mouse on the canvas. We are passing in e which stands for the element that is being passed into the function, in this case our canvas element. The subtraction is happening to account for the offset of the canvas position on the browser window, as mentioned earlier. Now we can actually draw our shape!
function setMousePosition(e) {
  mouseX = e.clientX - canvasPos.x;
  mouseY = e.clientY - canvasPos.y;

  context.beginPath(); // tell canvas you want to begin drawing lines

  context.moveTo(mouseX, mouseY); // move where the cursor starts the line
  context.lineTo(mouseX - 25, mouseY + 125); // draw first line
  context.lineTo(mouseX + 25, mouseY + 125); // draw second line

  context.fillStyle = "#FF6A6A"; //set the color
  context.fill(); //fill shape with color
}
As you can probably tell from my comments on the code above , there are several steps to drawing a shape. First we have to tell the canvas we want to draw lines with context.beginPath and then we need to move our cursor. Since we want our triangle to follow the mouse, we move our cursor to the same coordinates.
I want my triangle to be a bit elongated, so when I define the end coordinates of my first line I want them to be just a little bit to the left (-25) and farther down (+125). To keep my mouse centered to the top of my triangle, I set my other line coordinates to be the same amount, but in the other direction on the x coordinate (+25). The final line goes back to our original coordinates, so you don’t need any additional code to complete the triangle shape. Now we can set the fill style to the hexadecimal code for a sort of salmon-y color. You have to call the fill function in order for that color to actually be applied to your shape.
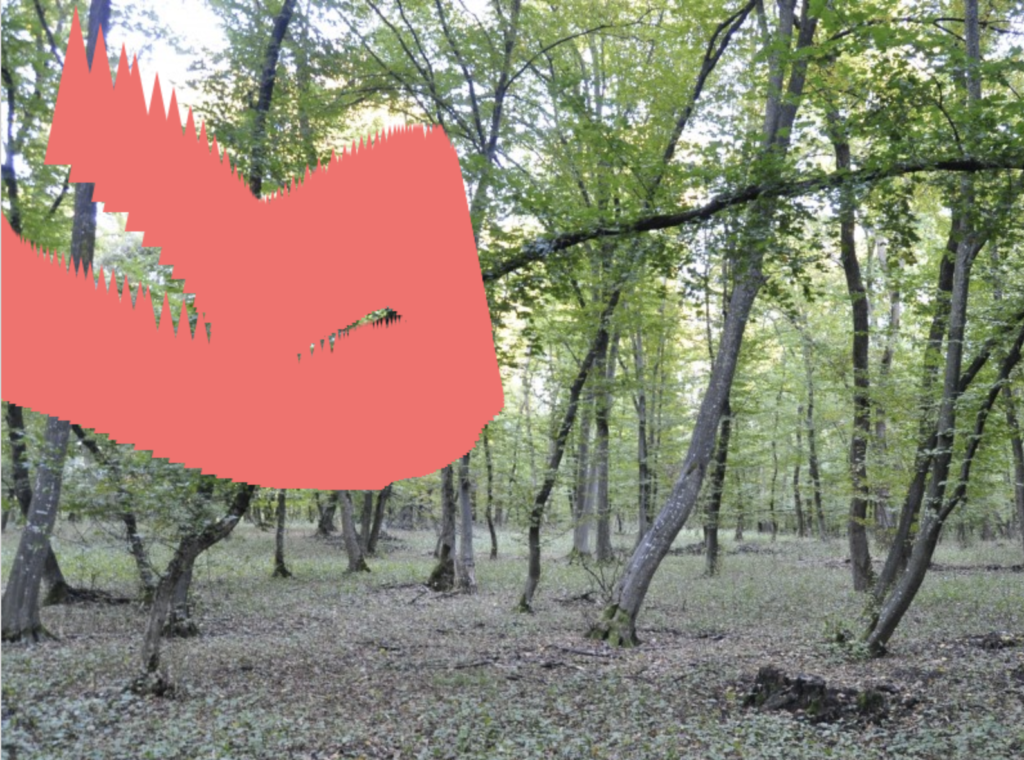
We’re getting close but if you run the code now you might see something is a little strange! Instead of having a triangle that follows our mouse we seem to be painting the canvas. That is because the canvas is constantly drawing more triangles every time we move our mouse and the canvas isn’t getting cleared. Luckily clearing the canvas is pretty easy.
function setMousePosition(e) {
  mouseX = e.clientX - canvasPos.x;
  mouseY = e.clientY - canvasPos.y;

// add the lines below

  context.clearRect(0, 0, canvas.width, canvas.height); //clearing canvas
  context.drawImage(img, 10, 10); //drawing our image again since that got cleared out

  context.beginPath();

    context.moveTo(mouseX, mouseY);
    context.lineTo(mouseX - 25, mouseY + 125);
    context.lineTo(mouseX + 25, mouseY + 125);

  context.fillStyle = "#FF6A6A";
  context.fill();

}
The clearRect function takes four values, x and y coordinates which define the upper left corner of the rectangle, as well as a height and width. If we provided something smaller than the canvas height and width only a portion of our canvas would get cleared, but we want to clear all of it. Of course this clears our image as well so we need to draw that back to the canvas again. This all needs to happen before we draw our triangle or it will get covered up by our image.
Now you should have a lovely little elongated salmon triangle floating around on top of our forest image, following our mouse obediently. There is only one thing left to do. We need to give the user some indication when they have “discovered” the pattern. There are a lot of fancy things that could be done here. We could display some text to tell the user they have found the pattern. We could add some fancy animation like in the actual Hellblade game. But for the sake of brevity and to give you freedom to experiment with canvas on your own, lets just change the color of our triangle. This code will be added to the bottom of our setMousePosition function.
if(mouseX > 625 && mouseX < 630) {
    if(mouseY > 10 && mouseY < 20) {
      context.fillStyle = #a117f2";
      context.fill();
    }
  }
Here we are checking our mouseX and mouseY coordinates to see if they match with the coordinates where we know our shape is in the image. You may notice there is a range of 5 pixels in both the x and y coordinates, because it is actually quite difficult to get your mouse on 1 or 2 specific pixels.
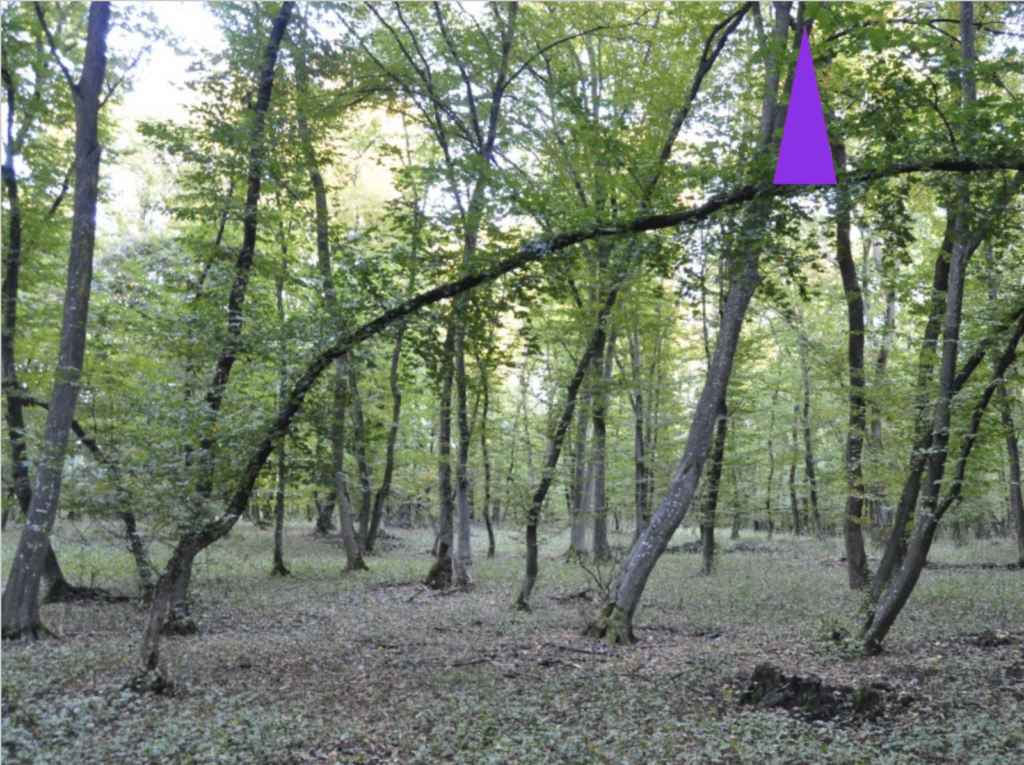
I took the liberty of figuring out the coordinates for the image in our tutorial, but if you want to do this with a different image or a different shape you will need to add some console.log statements to your mouseX and mouseY so you can gauge where the shape should change colors. I’m changing the color to a simple purple, though you can obviously change it to whatever color you choose. Check out my version on Glitch here.
Thats it! Hopefully you feel like you are one step closer to mastering Javascript. Now you can plug in any image and see if your friends can figure out if they can find the pattern. It’s obviously not too difficult with the shape and image I provided, but it can certainly be made more difficult with a larger image or a more unusual shape. I recommend checking out the following tutorials if you are interested in expanding your knowledge of drawing shapes and images with the canvas element:
Drawing Shapes
https://developer.mozilla.org/en-US/docs/Web/API/Canvas_API/Tutorial/Drawing_shapes
Transform + Text
https://eloquentjavascript.net/17_canvas.html
Build a Drawing App
http://www.williammalone.com/articles/create-html5-canvas-javascript-drawing-app/
Working with Video
If you enjoyed this article, consider following me on Twitter @nadyaprimak or if you need more tips on breaking into the tech industry, you can read my book “Foot in the Door”.
